Monday, April 25, 2022

I Love Mason Jars

I have to admit, I have a lot of mason jars.  A few years ago, I used them as drinking glasses, made cheesecake desserts in the mini ones and even have some old ones that are being used as part of my decor.  I'm not sure why I'm always drawn to glass jars, but I love my mason jars.  :)

This week I painted some of them with chalk paint, sanded them and then added a coat of wax to them for the finishing touch.  Today I added some tags and charms to the lids to spruce them up a bit.  

I painted them in pink and gray paint, but I want to paint more of them using other colors, as well.  For these two gray jars, I added some yellow and bee tags and charms to them.

Here is another gray one with a blue tag and charm.  What am I going to do with them?  I put them into my Vintage Market display.  Perhaps I will find someone who loves the jars as much as I do.  :)

Do you love mason jars?  What do you do with yours?  


Saturday, April 23, 2022

Celebrating Easter with My G-Baby


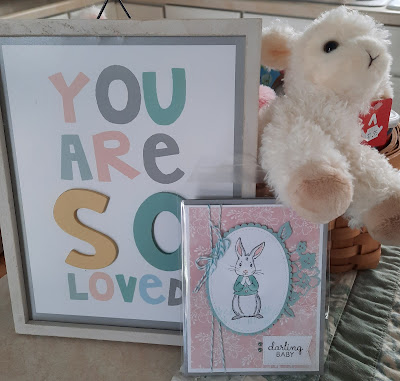
This year we are celebrating my little g-baby's first Easter.  I put together a little Easter basket with some baby treats and an outfit for her.  For her card I chose Fable Friends because of the sweet little bunny that it has in it.  I made the card to match the sign that I got for her in her Easter basket.  I love having a little one to celebrate with and make things for.  :)


I found this cute little sign that says You are SO Loved and bought it to hang up in the nursery.  The little lamb is from a country store that we went to last week.  I made the bunny card using the cut out and papers from the Hand Penned suite.

I think he is just so cute!  


And here is the little Bunny Girl herself all decked out for Easter and sporting her bunny rabbit ears!  


Sunny Day Cards

Recently I saw some really cute cards and tags made with the Sharing Sunshine stamp set.  It's a set that doesn't look like much until you start making things with it.  

I made this bright and sunny card and added a saying from Sunny Sentiments.  The papers are from Fine Art Floral.  I got the idea for this card from Meg Loven on Pinterest.

This next card is filled with Sunshine, too.  I really like this saying so I had to buy Celebrate with Flowers just to get it!  I used some older designer papers that I had lying around.  The yellow trim on the side is from Brilliant Rainbow dies.  Sweet, right?

For this next card I used Bermuda Bay cardstock and added some gingham papers from a few years ago.  The saying is from the Rainbow of Happiness set and the clouds are cut from the Rainbow papers that were in the last Sale-a-Bration.  This card is a fancy fold that I saw from the Kitchen Table Stamper.  

And the inside of the card has a surprise rainbow in it!  

For the final Sunshine card, I made this using Hand Penned designer papers, and added an old die called Sunshine Wishes.  I fussy cut the flowers from the paper.  I got the idea for this card from someone on Pinterest but can't find her name.  (Let me know if this is your card idea and I will give you the credit.)

Working with this stamp set and it's coordinating sayings was so much fun.  I will definitely be making more cards and projects filled with Sunshine!  :)


Sunday, April 10, 2022

Vintage Market in My House?

My friends and I love to go to the Vintage Market Fairs in our area.  There are two coming up soon and we're busy making plans to go!  Recently a couple of my friends and I decided that we wanted to get some booths at one of them and start doing some craft fairs.  We talked about what we wanted to sell and decided that we needed to start making some things if we are going to make it happen.  

So I moved a couple of wire rack shelves into my dining room/crafting room to start setting things up so I would know what I need to make and use for displaying my items.  I am having fun at second hand shops picking up some picnic baskets and old things to use.  There's a little shop not too far away called Captain's Treasures and we have been stopping in for our "treasures."

This week I started by making some pretty little flower shaped bowls.  I am using Folktale fabrics by Lella Boutique and love how they are turning out.  I bought the pattern from Etsy and spent a few days working on them.  Of course, I want to make a lot more, but this is a good start.  I've made about ten so far.  Don't you love the pretty muted colors and the flowers in the fabric?  I want to think of some more items to make using these pretty fabrics.  

I love using little birds in my decor around the house.  This week I made some little fabric birds to put into my display.  I chose some colors from nature to make the birds from.  They are fun and easy to make.  Although, you can set them into a bowl or in a display, I added a hanging string on them.  They can be hung from a cupboard or a doorknob.  Or even from a display tree.

When I put the little birds into the tree, I thought they looked great for spring!  I will definitely be making more of these cuties.  

I am having fun setting up my displays.  Of course, I need to make a lot more items to fill it with.  I'll be keeping you posted.  :)


Tip Toe Through the Tulips


For spring, I decided to do a stamping class featuring Tulips.  I used the Flowering Tulips and Tulip Fields stamp sets along with the Flowering Fields designer papers.  Don't these cards just remind you of spring? 

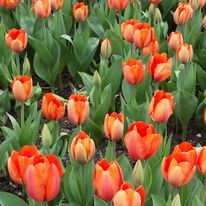
Here is upstate NY we have a tulip festival every year and the flowers are just so pretty to see.  There are so many different colors and shapes of tulips.  They are spread out through the park in different sections and usually draw a pretty big crowd.

I designed these cards to remind me of the beautiful flower displays that we have.  


For my first card, I used the Tulip Fields stamp set, adding a windmill and a sweet little fence near the top of the card.  I sponged some Soft Sky color onto the top of the card to create the sky.  I thought the card looked like it should be a Mother's Day card, so I added the saying onto some tag cut outs.  Lastly I stamped a couple of tulips to add some more color to the card.  I got the idea for my card from Patty Bennett.


The second card features a tulip from the Flowering Tulips stamp set.  Combined with the pretty designer paper, I think this makes a beautiful card.  I added some of the new brushed brass butterflies as accents to my cards.  This card idea is from Lisa Freeman on Pinterest.

Here is the same card made in purple colors.  It has a whole different look to it than the red card.  Softer and not as bold, perhaps.


To Coordinate with the purple tulips, I made another purple card with less stamping on it.  Stamp a saying, and then add a couple of butterflies!  I cut out two butterflies, one in gold and one in the designer paper.  I would like to try this layout using different colors and papers.  I got the idea for this from Tracy Bradley.

Using the pretty orange tulip papers, I made this card that features the tulip strip die from the Tulip dies.  I added some "flowers" for the bottom and sponged on some color to the tulips.  The color got a little washed out in this photo.  It's much brighter and happier in person.  

I loved using these paper and stamps.  Next time I will made more cards using the windmill dies.  Now I think I'm ready for spring!


Landscape Cards - Like Taking a Trip to the Ocean

The closest ocean from where I live in upstate NY is about 3.5 or 4 hours away, depending on which direction you head, towards Boston or to Maine.  I usually try to make the trek at least once a year, but because of covid I haven't been to the ocean in close to three years.

However, this week I worked on these amazing ocean cards that I copied from another demonstrator, Gail Ellis.  Each of the three cards uses transparent sheets to add another layer to the ocean landscape and were so much fun to make.  Thank you, Gail for your creativity.

For the first card, the transparency is added onto the top layer, under the clouds.  The fence, rocks, palm tree and pebbles are on the clear sheet.  The stamping is done on a white layer, which is also attached to the top of the card and stands free.

In this photo, you can see the clear layer better.  Using the transparencies on these cards gives them more dimension and interest.  They take a bit longer to make, but the final result is awesome.  :)


Card #2 also attaches the clear sheet at the top of the page, hidden under the one inch flap.  Another cut off piece is at the bottom of the clear sheet, giving this card more of a "ground."  The palm tree is on the clear sheet of this card.  

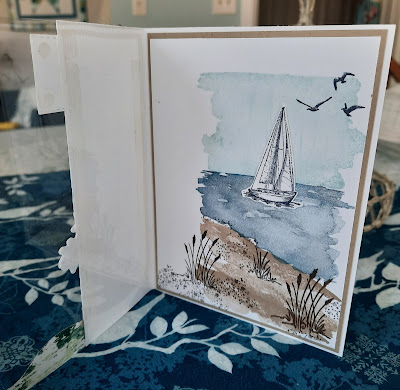
This card opens vertically and here is what the inside looks like.  

For this card, the transparency is part of the front of the card.  It is attached on the inside of the front.  I added another white layer to the inside on top of the clear sheet to create a space to write the greeting.  If you look closely, you can see a layer of "sand" that extends to the end of the clear sheet on the front of the card.  


Here is the inside of the card (before I added the white layer).  I put a sailboat in the water and added some birds from another stamp set.  

For all three of my cards, I kept the basic stamping colors the same.  I used Pool Party for the sky, Misty Moonlight for the sea and Crumb Cake for the sand.  This gives the cards a more uniform look to them and makes it easier to keep the colors straight for the ladies in my stamping class.

Although I've used transparencies in my cards before, I love the creative use of the clear sheets on these cards.   I used Oceanfront and Paradise Palms stamp sets, Horizon and Palm dies and to really make them special, the Pebbles Enamel Shapes for the stones.  


Bloom Where You Are Planted

When I saw these cute little plants in this year's Stampin Up catalog, I knew that I would want to get them.  It sat around for some time, but I finally took out this suite of products and made some cards with it!  Bloom Where You Are Planted features some pretty designer papers, nice stamps and some really cute cut outs.

For my first card, I used the die cut from the Tulip dies to make the mosaic peek through for the background.  Don't you just love this look?  The papers is from the Bloom suite and the two outer images are stamped and cut out.  I tucked in a little die cut plant in the middle and added some black and white twine.  The base of the card is Gray Granite.  I got the idea for this card from Brandy Cox.

My second card is all images from the designer paper that I cut out and put on my card.  I love the brick wall, don't you?  Easy and so sweet.  :)

For the next card, I painted color onto watercolor paper and cut out the images, using mostly just the die cuts for this card.  I gave the color palate a softer look for this card.  I used basic gray for the neutral color.  I got the idea for this from Tammy Wilson.  She uses a lot of watercolor paper for her cards.

I tried making the card again with some darker colors for the watercolor papers.  But I'm not sure if I like it any better than the first card.  Which one do you like better, the one with the lighter colors on it or the darker?

Lastly, I made a card with a slight modern look to it, with black and white images and the teal for an accent color.  This card is supposed to look a little wonky, with assorted pieces of embellishments on it.  I colored some old butterfly accents to match the card.  

I kind of like the clean look of the card.  What do you think?

All in all, I had fun using this set.  I especially liked the macrame holder to hold the plants in.  I will definitely be using it again.  :)


I'm not very good with real plants, but the ones on my cards sure look nice!