Monday, February 14, 2022

Happy Valentine's!

This year it seemed like Valentines Day just crept up on me so quickly.  Maybe it was because the Super Bowl was yesterday and not the first week in February.  Last night I had some ladies over to do a little stamping for my Super Bowl Sunday Stamp-a-Thon.  :)  We made a lot of different cards.  

The card that I worked on was a Valentine card for my little g-baby.  Even though it might arrive a little bit late, I still want to send it out in the mail to her.  I used the Kangaroo and Company stamp set for the little kangaroo, hearts and mail.  

I put Wink of Stella on the hearts and on parts of the kangaroo.  It makes the whole card kind of sparkly.  :)


Saturday, February 12, 2022

Card for My G-Baby

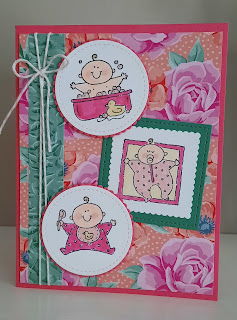
A few weeks ago I made this little card for to send to my granddaughter.  I call her my g-baby, for short.  I remembered a very old stamp set that I had in the "archives" and stamped and colored some of the baby images for her card.  I used some pretty flowered paper from last year for the base of the card.  I wanted to let her know that I was very proud of all that she has accomplished this past half year.  Even though she can't read and doesn't really understand cards yet, hopefully her mom will save them for when she is older and she can look through them.  

I stamped "So Proud of You" from the Royal Peacock stamp set and put that on the inside of the card.  I didn't really seem to fit on the front, so it's perfect for the inside. 

I love how the card turned out.  There are more baby images that can crawl, walk and talk.  So I may take this set out again once she reaches those milestones.

Here is a recent pic of the two of us.  She is the happiest baby and hardly ever cries.  I just love her so much.  :)

I look forward to spending more time with her in 2022.  


Catching Butterflies

There are so many really cute stamp sets and papers in this year's Jan-Feb Sale-a-Bration catalog!  This is the little girl from Catching Butterflies.  Isn't she just so cute?  She looks a lot like some fairies that were in the catalog a couple of years ago.  I think she is just so sweet.

I used the Sunshine & Rainbows papers on her card to make it nice and bright.  I had to fussy cut the girl and the butterflies for this card, but it didn't take that long.  I colored her in with Stamping blends and added Wink of Stella to her dress, hair and the butterflies.  Even though you can't see it in the photos, she has a wonderful "sparkle" to her.  

You could also put balloon in her hand instead of the net, and make her card a birthday card.  If you cut her out, you can also make her a dancer or just a little girl in a scene.  What a cute image for a young girl's card! 


Starting the Year Off with Sunshine & Rainbows

I realize that I haven't posted anything in a while.  I'm not even sure where all of my time goes.  LOL  But today I'm sharing a Desk Calendar that I made using the Rainbow of Happiness stamp set and the Sunshine & Rainbows designer papers from the new Mini catalog.  I always start off each new stamping year with a desk calendar.  I just love the bright and happy papers in this paper collection.  I'm happy to be able to look at this little calendar all year. I ordered the mini calendars online.

For the coordinating card, I used Coastal Cabana for the card base and used the rainbow cut-out dies.  Surprisingly, even after all these years, I do not have a rainbow stamp set!  I'm not even sure why.  But I do love this one.  :)

The word "friend" is from the Well Said cut outs.  I think it looks so sweet on this card.  

And I love the colors.  I'm glad that the designers chose to use colors other than primary for the papers.  I love how this turned out.  Simple, fun and easy!  


Here's a variation of the card that I made using the same layout.  This time I used Bermuda Bay cardstock for the base and added "baby" for the greeting.  I made this card for my little grandbaby.  And seriously, she does really make me happy.  :)

I also added a couple of small clouds to fill in the blank space.  I love how that looks on this card, too.  Finally I colored some pearls with the Blenders so that they would match.  

Don't you just love this set?


Up next is a card using the negative space that the rainbow cut-out makes!  I used think white cardstock for the base, Perfectly pink for the next layer and then the pretty rainbow paper for the next.  

I cut out a small piece of rainbow strips to fit behind the cutout, then layered it to my card.  Afterward I added some cute little clouds, but they didn't make it into the photo.  

I cut the rainbow focal piece just the right size to also include the saying on it, "You make me happy."  Who wouldn't want to get this cheery rainbow card?

Lastly I made a little magnet with one of the cut-outs and added a saying.  You can see it next to the card.  I got the idea for that from Brian King.  

The rest of my cards ideas came from the Stampin Up catalog.

What do you think of my rainbow cards and projects?  They all make me happy.  :)


Wednesday, December 22, 2021

Heart Ornaments from Sweaters

Anyone who knows me knows that I LOVE to make things from old sweaters!  There are bins of used sweaters all over my house.  This year I made more of the heart sweater ornaments.  I mean, like a LOT more.  Probably over 100 of them.  


They are fun and easy to make.  Part of the joy of making them is going on the "hunt" to find the used sweaters that you can use to cut up.  I like to go to some second-hand shops and rummage sales to find just the right colors and textures for my crafting.  I'm always on the look-out for that special find.  


My favorite sweaters are the ones that have a pattern on them, but they are hard to find unless you are willing to pay a lot for them.  And I like using ones that have wool in them so that they shrink a bit and don't unravel as easily.  

To make them, wash your sweater in hot water and dry on a hot heat setting so that the fibers meld together.  I use a heart cut out shape and sew them right sides together leaving a one-inch space to turn them inside out.  The best thing about working with the sweaters is that the fabric is very forgiving.  You can stretch it back into shape.  Stuff with fiber fill and sew closed the opening.  I used a thick gold strand for the hanger.  They can be used as ornaments or as bowl fillers for your table display (just cut off the hanging loop).

I like to give them in groups of three or four so that the colors coordinate well together.  They make beautiful hand-made gifts around the holidays.  :)


What sort of things have you made from used sweaters?  


Buffalo Checked Deer Ornaments

Every year, I make some handmade ornaments to give out to my family and friends.  This week I made these Buffalo-checked deer ornaments using Peaceful Prints designer papers that were in the summer's Sale-a-Bration catalog.  I bought the punch that coordinates with the deer and put these together.  I got the idea from one of my stampers, Melissa McClellan.

To give to my daughter, I made a set of three of these ornaments.  I used coasters for the base, trimmed them and rounded the corners and then added the designer papers.  They measure approximately 4 x 2 3/4 inches.  

Here is the third one.  I cut out the snowflakes from the designer paper by hand.  Then I added some red twine and rhinestones for embellishments.  The tree is from In the Pines set and the sayings are from various Christmas stamp sets.  I also added some washi tape on the edges and a tag topper from the Tailer Made Tag die cuts.  


I decorated the backs of each of the ornaments, as well, using some more sayings and snowflakes.  

I love how they came out.  I originally wanted to make more of these, but they were a bit more labor intense that I thought they would be when I got started!  

My daughter will love them and perhaps when I have a bit more time, I will make more of these.  I can imagine them in different colored papers with snowmen,, Santa or other holiday images.  


I love them as a set - kind of like a Trio of Tags for the tree.  :)


Tuesday, December 14, 2021

Tree Ornaments Using Fig Tree Fabrics

Every year I host an Ornament Exchange with some of my crafty friends.  For this year's ornament, I made some quilted trees from my Fig Tree Christmas fabrics.  I've made some things before using these fabrics, and I love them because they are bright and cheery.

To make them, I cut 1 3/4" strips from 4 different fabrics.  After I sewed them together, I cut them out into triangles using some of my triangle rulers.  I started with a 60 degree angle, but then kept trimming them into smaller triangles. 

I folded and sewed a brown strip for the trunks and then trimmed it into 2" pieces to make the trunks.  After I sewed them together, I added some little buttons to make them look decorated.  I used thick gold twine for the hangers.

I made extra trees to give away and packaged them up into homemade bags with a tag and some chocolates.  I put together an assortment of trees in different colors and sizes for the gifts.

I love having homemade ornaments to take out each Christmas to decorate my tree(s).  It's fun to remember our Ornament Exchanges and who gave each of them to me.  

Which ones do you like the best?  Strangely, my friends all chose the red tree ornaments for their ornament in the exchange.  I wasn't sure if the red tree idea was going to over well, but I guess I was wrong!  

I'm off to make some more.  They're fun to make and kind of cute.  What do you think?