Monday, July 31, 2017

It's Time for a Coffee Break

One of the sets that caught my eye in the Stampin Up new catalog was this set, Coffee Cafe.  Funny thing is, I don't really even drink coffee!

I guess it's the colors that drew me to this suite- I love the way these colors blend together- the browns, teals and greens.  Then I think it's the cute images that are on the designer paper.  You can cut them out and use them as embellishments on your cards and projects.

This first card, Happiness is a Cup of Coffee shared with a Friend, has some Espresso designer paper as the background and then the two cups of coffee that are "shared" together are set on a green striped banner to make them stand out.  I added the straw, sugar cubes and a button to give this card it's cute factor.  I put this card idea together myself. 

On this next card, I just love the paper that has coffee rings on it.  It goes great as a background for the Coffee Suite.  The band on the coffee cup has ridges on it that can be made using the die cuts that come with the set.  Then I took out an old tool- the crimper- and made the corrugated heart for the center embellishment.  In real life the card has a lot of dimension on it.  This idea came from Joann Mulligan.

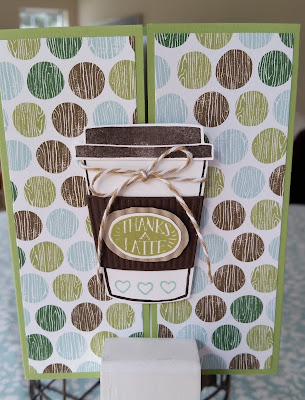
Third up is this gate-fold card.  It opens in the middle and has this cute coffee cup in the center, only attached to one side, of course.  Don't you just love this polka-dotted paper? 

Here is the card showing how it opens.  This idea came from Joann Mulligan, also.

Then I made this instant coffee favor.  It's made using the tag topper punch and then folded up, leaving a small gusset for the bottom to make it stand.  The hole used to insert the instant coffee packet is made using the small oval punch.  Then it's just decorated using cut-outs from the designer paper.  I saw this idea from thepaperedchef.  I purchased the coffee packets at Starbucks, 10 for $10, but when I was over at Walmart, I saw the same item for only $6.  You can also put tea packets or flavored drink packets in them.

Last up I made this little candy/gift card holder using a 6" square piece of designer paper. I remember making these paper drinking cups when I was a kid!  Now I'm making crafts out of them.  :)  I got the idea from Cindee Wilkinson.  If you click here, it will give you the instructions on how to make them.  

I had so much fun working with this set and the beautiful coordinating papers.  Have you tried using them yet?  Which one is your favorite?


Tuesday, July 4, 2017

Do Something Creative Every Day

One of the new stamp sets that Stampin' Up has to offer is called Crafting Forever.  Okay, doesn't that sound just like me?  Seriously, I just move from room to room in my house making crafts.

It has cute images of paintbrushes, pens, scissors, twine and of course, a rubber stamp!  It also has 3 cute sayings, but the one that I love the most is, "Do something creative every day." 

I made this little magnet the size of an Artist Trading Card which is 3 1/2" x 2 1/2".  I stamped the paint brushes onto white cardstock and then again onto designer paper and cut out the pot.  I used the Delightful Daisy paper and then coordinated the rest of the colors in my project to match with Calypso Coral and Tranquil Tide. 

The stamp image and saying really make it look crafty.   Add the bow or a button for the perfect embellishment.  What a great reminder to be creative, don't you think?

It's a Daisy Craze!

This week I made 3 cards featuring the Daisy Delight stamp set.  I wanted to show the ladies who come over to stamp with me the diversity of the Daisy stamp.  And I am loving this set.  
 
 Here is Card #2 (Card #1 is in the previous post), made with Bermuda Bay cardstock and accented with some sponging. 

For the sponging, I punched 3 different sized circles with punches onto a piece of scrap cardstock and then sponged them onto the white layer with different colors.  I used Flirty Flamingo, Bermuda Bay and Soft Sky.  Once you are done with that, randomly stamp the Daisy image using black ink. 

Add a saying and some rhinestones to make it sparkle.  Very different look, right?  I got the idea for this card on Pinterest from Amanda Mertz.

Card #3 is a bright and cheery yellow Thank You card.  For this card, I used thick white cardstock for the base, added black frame and some Daffodil Delight designer paper.  Then I used a circle framelit and added stitches with a white chalk pen.  I stamped and punched two daisies for the center.  I put the dimensionals under the black circle and under the saying.  The idea is from dutchstampin.blogspot.nl.

There are so many different ways to use the Daisy stamp set!  I think I've only just begun.  :)