Monday, December 28, 2020

Patriotic Carpenter Star Quilt

I didn't get as many quilts done this year as I originally had planned.  I'm not sure why; I did have a lot of time at home. (!)  There's still a few more days left and I might finish a couple more before the year ends.  

This year I wanted to make a patriotic quilt for my to be son-in-law.  He likes patriotic things and I thought the Carpenter Star would make a nice quilt for him.  

I started it about a month ago, hoping to get it done by Christmas.  I'm actually surprised that I did, but nothing else got made for gifts this December.  I didn't tell my daughter that I was making it just in case it didn't get finished.


I started by dividing the pattern into 4 quarters and made each quarter separately.  That seemed to work well because the quilt is fairly large.  It's only supposed to be a throw, but I think it came out larger than that.  I made each square 7", so 7 x 12=  approx 84" square. 

 It was bigger than I could work on with my sewing machine, so I had to use my longarm to quilt it.  

Here's a pic of Ginger helping me pin the pieces together.  She said that it was very comfy and gave her approval.  I hope that the recipient likes it as much as Ginger does!  :)


Gnome for Christmas


 I admit, I was really drawn to the gnome theme this year for Christmas.  Not only did I make them for my ornament exchange, but I decorated with them around my house, too.  Here you can see a couple of them on the mantle and fireplace.  I added gnomes to the tree, as well.

Here are a couple that I put out in the hallway when you first come in the front door.  They are everywhere, tucked here and there all around the house.  I found the larger ones at my favorite store, Marshalls Home Goods.  


I decided not to use red and dark green for my Christmas colors this year.  I added gold and silver to my tree and got some cute little houses at Target in the Dollar section.  I even found some cute fabric to use as runners in my stash with some soft pastel Christmas images on it.  I even made some pink hearts for the table and to hang on the tree from my sweater stash!  I love making things from used sweaters.  :)

I had to look around for a bit to find pink wrapping paper but eventually found some that I thought would work from Walmart.  I made homemade tags to match, too.  Here's a photo of Ginger guarding the presents.  She didn't like me putting them under the tree because that's where she likes to sit!  

What colors or theme did you decorate with this year?  I like to pick a theme and carry it through my house.  It's one way that I like to be creative during the holidays.  :)


Sunday, December 13, 2020

The Gnomes are Coming!


I am having so much fun making these little gnomes!  They work up fairly quickly and are easy to make.  There's certainly a bit of a cuteness factor to them.  :)

Yesterday I made 8 of them and today I worked on 8 more.  I'm sure this won't be the last of them, but I need to work on some other things for the next few days!

I first started to make them using white beards.  But after looking around in my craft room for a bit, I found some brown fur fabric.  The brown fur is thicker than the white and it gives them a very full beard!  I found myself giving them a layered beard cut after I glued them together.  Ha ha.


These little red striped gnomes are for my Ornament Exchange.  Each year my crafty friends and I get together for an exchange party.  They will be able to choose if they like the white or the brown beards.  I can't wait til the ladies see them.  Our exchanges are so much fun!  

Have you ever done an exchange? What's your favorite part about it?


Gnome Ornaments for the Holidays


 You see them in all the stores.  These cute little gnome figures seem to be the trend for this year's holiday decorating.  So of course I just had to make some!

This year I decided to decorate my home with soft colors other than the usual red and green.  I found some cute gnomes in the stores and I'm using them for my Christmas decor this year.  They are muted colors and so I decided to go along with that scheme.

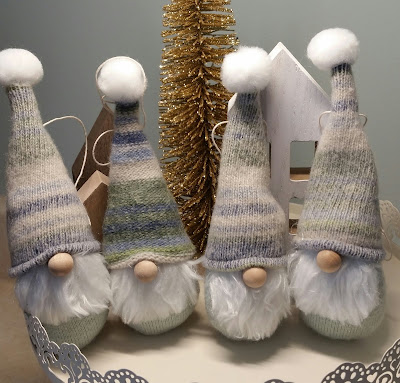
I looked a couple of patterns online and then decided to make my own pattern.  I love to make things from old sweaters and I pulled out a few from my stash (4 bins worth) and started sewing.  Their little bodies are pretty much a Letter "U" sewn and stuffed.  Then I added the beards made from some fake fur that I had.  I found that it works better if you sew the top of the beard before cutting them out to keep them from fraying.

I stitched the hem and the sides of a triangle to form the hats and then glued all the pieces together.  Then I added the nose and the pom pom.  Each one is a little bit different and somehow they seem to have their own personality.


These four look like they're singing in a old-fashioned quartet.  LOL

They look really sweet on my tree and go right along with this year's theme.  
 
What do you think of the gnome theme this year?  Maybe there's just a little bit of mystery behind their folklore that makes them appealing.  These little gnomes found their way into my home.  And into my heart.  


Saturday, December 5, 2020

A Partridge in a Pear Tree

I've always like cards made with the Partridge in a Pear Tree theme.  Over the years I've passed up on stamp sets that I could use.  This card is made using the Arrange a Wreath stamp set and it's coordinating die cuts that are in the regular catalog.  You can do so many things with this wreath set and I was glad to see that I could finally make my Partridge in a Pear Tree card!

I paired it with the Feels Like Frost designer papers to make this partridge card.  Simple and yet lovely.  Thank you, Kimberley Morris, for the idea.  

I cut the pears out of silver metallic paper and although you can't tell from the photo, this card really "shines."  At one point I was making more holiday wreath cards, but time cut me short.  Maybe sometime I will take this set out and work on making some more.  

Have you ever made a Christmas project using the 12 Days of Christmas as your theme?


Merry Moose

I just have to say that I loved using the Merry Moose set from the holiday catalog.  He was around last year and sadly, I didn't get him then.  When he made another appearance this year in the catalog, I knew that I had to have him.

I got the idea for this card from Angie at Chic 'n Scratch.  She always does fun things and I like to look at her blog.  

I added some tags to go along with the moose card and while I was making him, I renamed him "Moosey Boy."  It has a catchy ring to it.

My daughter lives in the Adirondacks and if time allows I may be making more "Moosey" items to send and give to her this Christmas.  

Have you ever seen a real Moose?  


Frosty Fun

These little guys are having some "frosty" fun on the slopes in this whimsical card.  They were so much fun to stamp and color in.  The set is called Freezin' Fun and comes with die cuts.  I can't wait to make some more projects using these sweet little snow animals.  Michelle Litwiller's site is where I got my inspiration from.  

Another fun snowy friend is the polar bear from the Warm & Toasty stamp set.  He's doing some fancy moves on the ice with his little mouse friend today.  I added some In the Pines to the background to make it look like he is skating on a pond in the woods.  Thanks, Vicky Boucher for the idea.  


Crafting days at my house are always fun.  I just wish there were more of them.  :)


In the Pines

Although I have a lot of "tree" stamps in my collection, I have to say that I love the trees from In the Pines.  They just seem so realistic to me.  I made these two cards using the set and got the ideas from Narelle Farrugia.  

I love the contrast of the Tranquil Tide mixed with the white card.  I stamped the trees in black and then added some different greens to the forest.  I found some ruched ribbon in Tranquil Tide and like how that looks on the card, too.  I added in a bit of Pear Pizazz to bring in another color.  And the honeycomb embossing folder adds a nice touch to the background.

For this card, also from Narelle, I added a small hill in Pear Pizazz.  I used the Thinking of You stamp because I don't this set needs to be defined as only being used for Christmas cards.  The background uses the Evergreen Forest embossing folder.  

The cards have a peaceful look to them, like you are taking a walk in the woods during winter.  These cards would look cute with a little deer added to them.  Maybe for next time...


Christmas in Florida

One of my sons recently moved to Florida.  He loves the warm weather and has been braving the cold winters here in upstate NY for many years.  

I was looking through my stamp sets to make him a Christmas card and found this cute little Santa dressed in his bathing shorts and getting ready to go surfing!  He's having a pina colada on the beach in the palm trees.  :)

Here is the inside of the card complete with palm trees.  The set is called So Santa and was around a couple of years ago.  The sayings are so cute, too - "Ho, Ho, Ho - who needs snow?"  As I get ready for winter, sometimes I wonder this myself.  

I don't have many Christmas stamps to use for people living in FL, so I may have to make a variation of this card for many years to come!  

What do you think of this warm-weather Santa?


Holiday Gnomes

The first set that caught my eye in this year's holiday catalog was the Gnome for the Holidays stamp set.  It features 3 cute little gnomes decorating and getting ready for Christmas.  I like buying and using sets that a little bit different from what I already have.

This is just the sweetest little card featuring the gnomes that I've seen!  The original idea is from Jo Blackman.  I love having the gnomes peek out of the little windows on this card.  :)  I changed up some of the designer papers and used the Merry Christmas word dies.  It's one of my favorites this year.


Next up is the little man gnome trying to find a place to hang his Christmas ornament.  I used trees from In the Pines to create the forest and paper from the Heartwarming Hugs collection. So sweet!

The next card has the little girl gnome standing outside of their home.  She may have gotten confused as to where she was supposed to put the Christmas tree!  This card idea is from Cathy Bethel.  I used Heartwarming Hugs for this card, too.


To compliment the gnome cards, I added this In the Pines tree cut out card.  I used the same holiday papers so that all of the cards would coordinate, giving them a cohesive look.  This card was easy to make, but I love it's simplistic impact.  This idea is from Patti Dolan.


Are you into the holiday Gnomes this year?


Welcome to Poinsettia Place

Over the years Stampin Up has had several Poinsettia stamp sets in the holiday catalogs.  But this year the Set, Poinsettia Petals is so amazing!  After seeing so many beautiful samples on Pinterest, I knew that I had to get it for my own holiday crafting.  :)

This pretty gold card is made using gold embossing powder with gold accents leaves.  I also added the Plush Poinsettia velvet flocked paper!  I added Misty Moonlight cardstock for the background, but you could put any color background cardstock on this card and it would be beautiful!  I got the idea from Jan Clothier.

Another beautiful card that I made to coordinate with the previous one is this fairly easy gold embossed card.  It features the In the Pines cut outs and the Evergreen Forest embossing folder.  I added a strip of the metallic cardstock to the front of the card and ran them both through the folder.  Then I added the front to some thick white cardstock for a white-on-white look to the card.  I embossed the saying from For Unto Us stamp set and cut it out with the stitched circle framelits.  Add some bling and welllah!  A beautiful card.  From Kerry McDonough.


Seemingly every time I take the camera out to photograph my cards, my kitty Ginger wants in on the action.  Here she is posing along with the two cards.  Actually, she was trying to eat the gold tree, but let's not talk about that.  :)

I made this card using the Poinsettia Petals.  This time I stamped the flower petals in Basic Brown and in Olive Green for the leaves.  I added some gold metallic sprigs to bring out the gold highlights in the papers.  I embossed the saying with gold powders.  You can also see the inside of the card.  This idea came from Christy Fulk.

Lastly I wanted to stamp the petals onto vellum cardstock for a more muted look to the poinsettia.  I colored them on the back side with Sweet Sugarplum ink and used the same color for the card base.  I got the idea from Mary Brown.

Altogether I loves the "golden" look of these poinsettia cards.  And today I found out that this set will be available past January.  I just might try using it in additional colors.  


Two Different Advent Calendar Looks

Last year I bought the holiday Advent Calendar kit from Stampin Up.  I put it together this year to give to my daughter, who loves them.  

I added some of my own stamps from various sets, ribbons and buttons for embellishments.  It was fun and easy to put together.  I hope that she uses it for a many years.  I put candies in the drawers and an idea every day to make Christmas special each year.  

Here you can see some some of the drawers a little closer up.  I loved adding the little dog and other holiday images from the set Ready for Christmas.  


There's even a little plate of cookies in it!

I had so much fun making the Advent calendar that I decided to make another one, this time for my craft room and not for Christmas!  I used the template in the kit to cut the drawer fronts from a package of designer paper that I had lying around called Share What You Love.  

I added buttons to each of the drawers and love how it turned out.  :)  I might add some trinkets to the drawers and maybe some candy to snack on when I am crafting in my room!  

What sort of calendar would you make?


Heartwarming Hugs

This week I worked on some cards and projects using the Heartwarming Hugs suite from the mini holiday catalog.  I love the warm red homespun look that it brings.

I started with the coffee mugs holder and made it into a hot cocoa gift set.  The cup has chocolates in it and the little " gift bag" has a hot cocoa mix.  I added some mini marshmallows and love how it all came together.  :)  

Here you can see a little better what I put in it the carrier.  It makes a sweet little gift to give to someone.  :)

For this card I used the set Christmas Cheer and added in a mini marshmallow stamp that I had from an old set.  I like the candy cane cut out and the little greenery in the cup.  I saw the idea for this from Anne Marie Hile on Pinterest.  

This card uses A Merry Hello hostess stamp set.  I got the idea to fold back the designer paper from someone on Facebook.  I can't find her name, but I do love the card idea.  (Let me know if this idea is from you and I will give you the credit.)


And lastly, I made a little gift card holder using an older Label die set.  This is so cute for putting in a gift card or tucking in some money.  I would love to make more of these and put them on the tree!  This idea is from Julie Gilson.  

How is your holiday crafting coming along?  I'd like to make these coffee cup sets in some blue snowflake papers and have them for after Christmas. :)