Showing posts with label handmade ornaments. Show all posts

Wednesday, January 15, 2025

11th Annual Ornament Exchange

This year we had two new girls attend our annual Ornament Exchange, with a total of 9 ladies.  We love our special night together; it's really one of the highlights of the Christmas season for me.  

My son is usually here to get our photos, but this year we were on our own and had to take selfies.  

The night begins in the kitchen, where we have appetizers, dinner and maybe even a little Christmas cocktail.  Everyone brings something to share and the variety is always so exciting.

Don't you just love Amy's dress?  Seriously, I would wear that if it was mine.  :)

Here we are snacking and waiting for everyone to arrive.

After dinner, we move to the family room and we each take turns telling about our ornament - how we got the idea, how we made it, etc.  Linda had taken a trip to the German market and ended up making us each a little Scandinavian horse.  

This is Kim and she made some pretty little trees that she sewed and added sewing embellishments onto.  


Amy found some greenery and made a cinnamon stick Christmas tree embellished with buttons.  Although I don't have photos of all of the ornaments (not sure why), they were all amazing!  The ladies spent so much time and effort into making their ornaments.

After our exchange, I have another ornament craft ready to make at the crafting table!  We wrap up the night crafting, chatting and just having a great time.  

I am honored to have these wonderful crafty friends and each year I can celebrate that by putting their ornaments on my tree.  Have you ever been to an Ornament Exchange?  Have you ever thought about hosting one?  You just need a few crafty friends to get started.  


Saturday, December 3, 2022

Stocking Ornaments from Sweaters

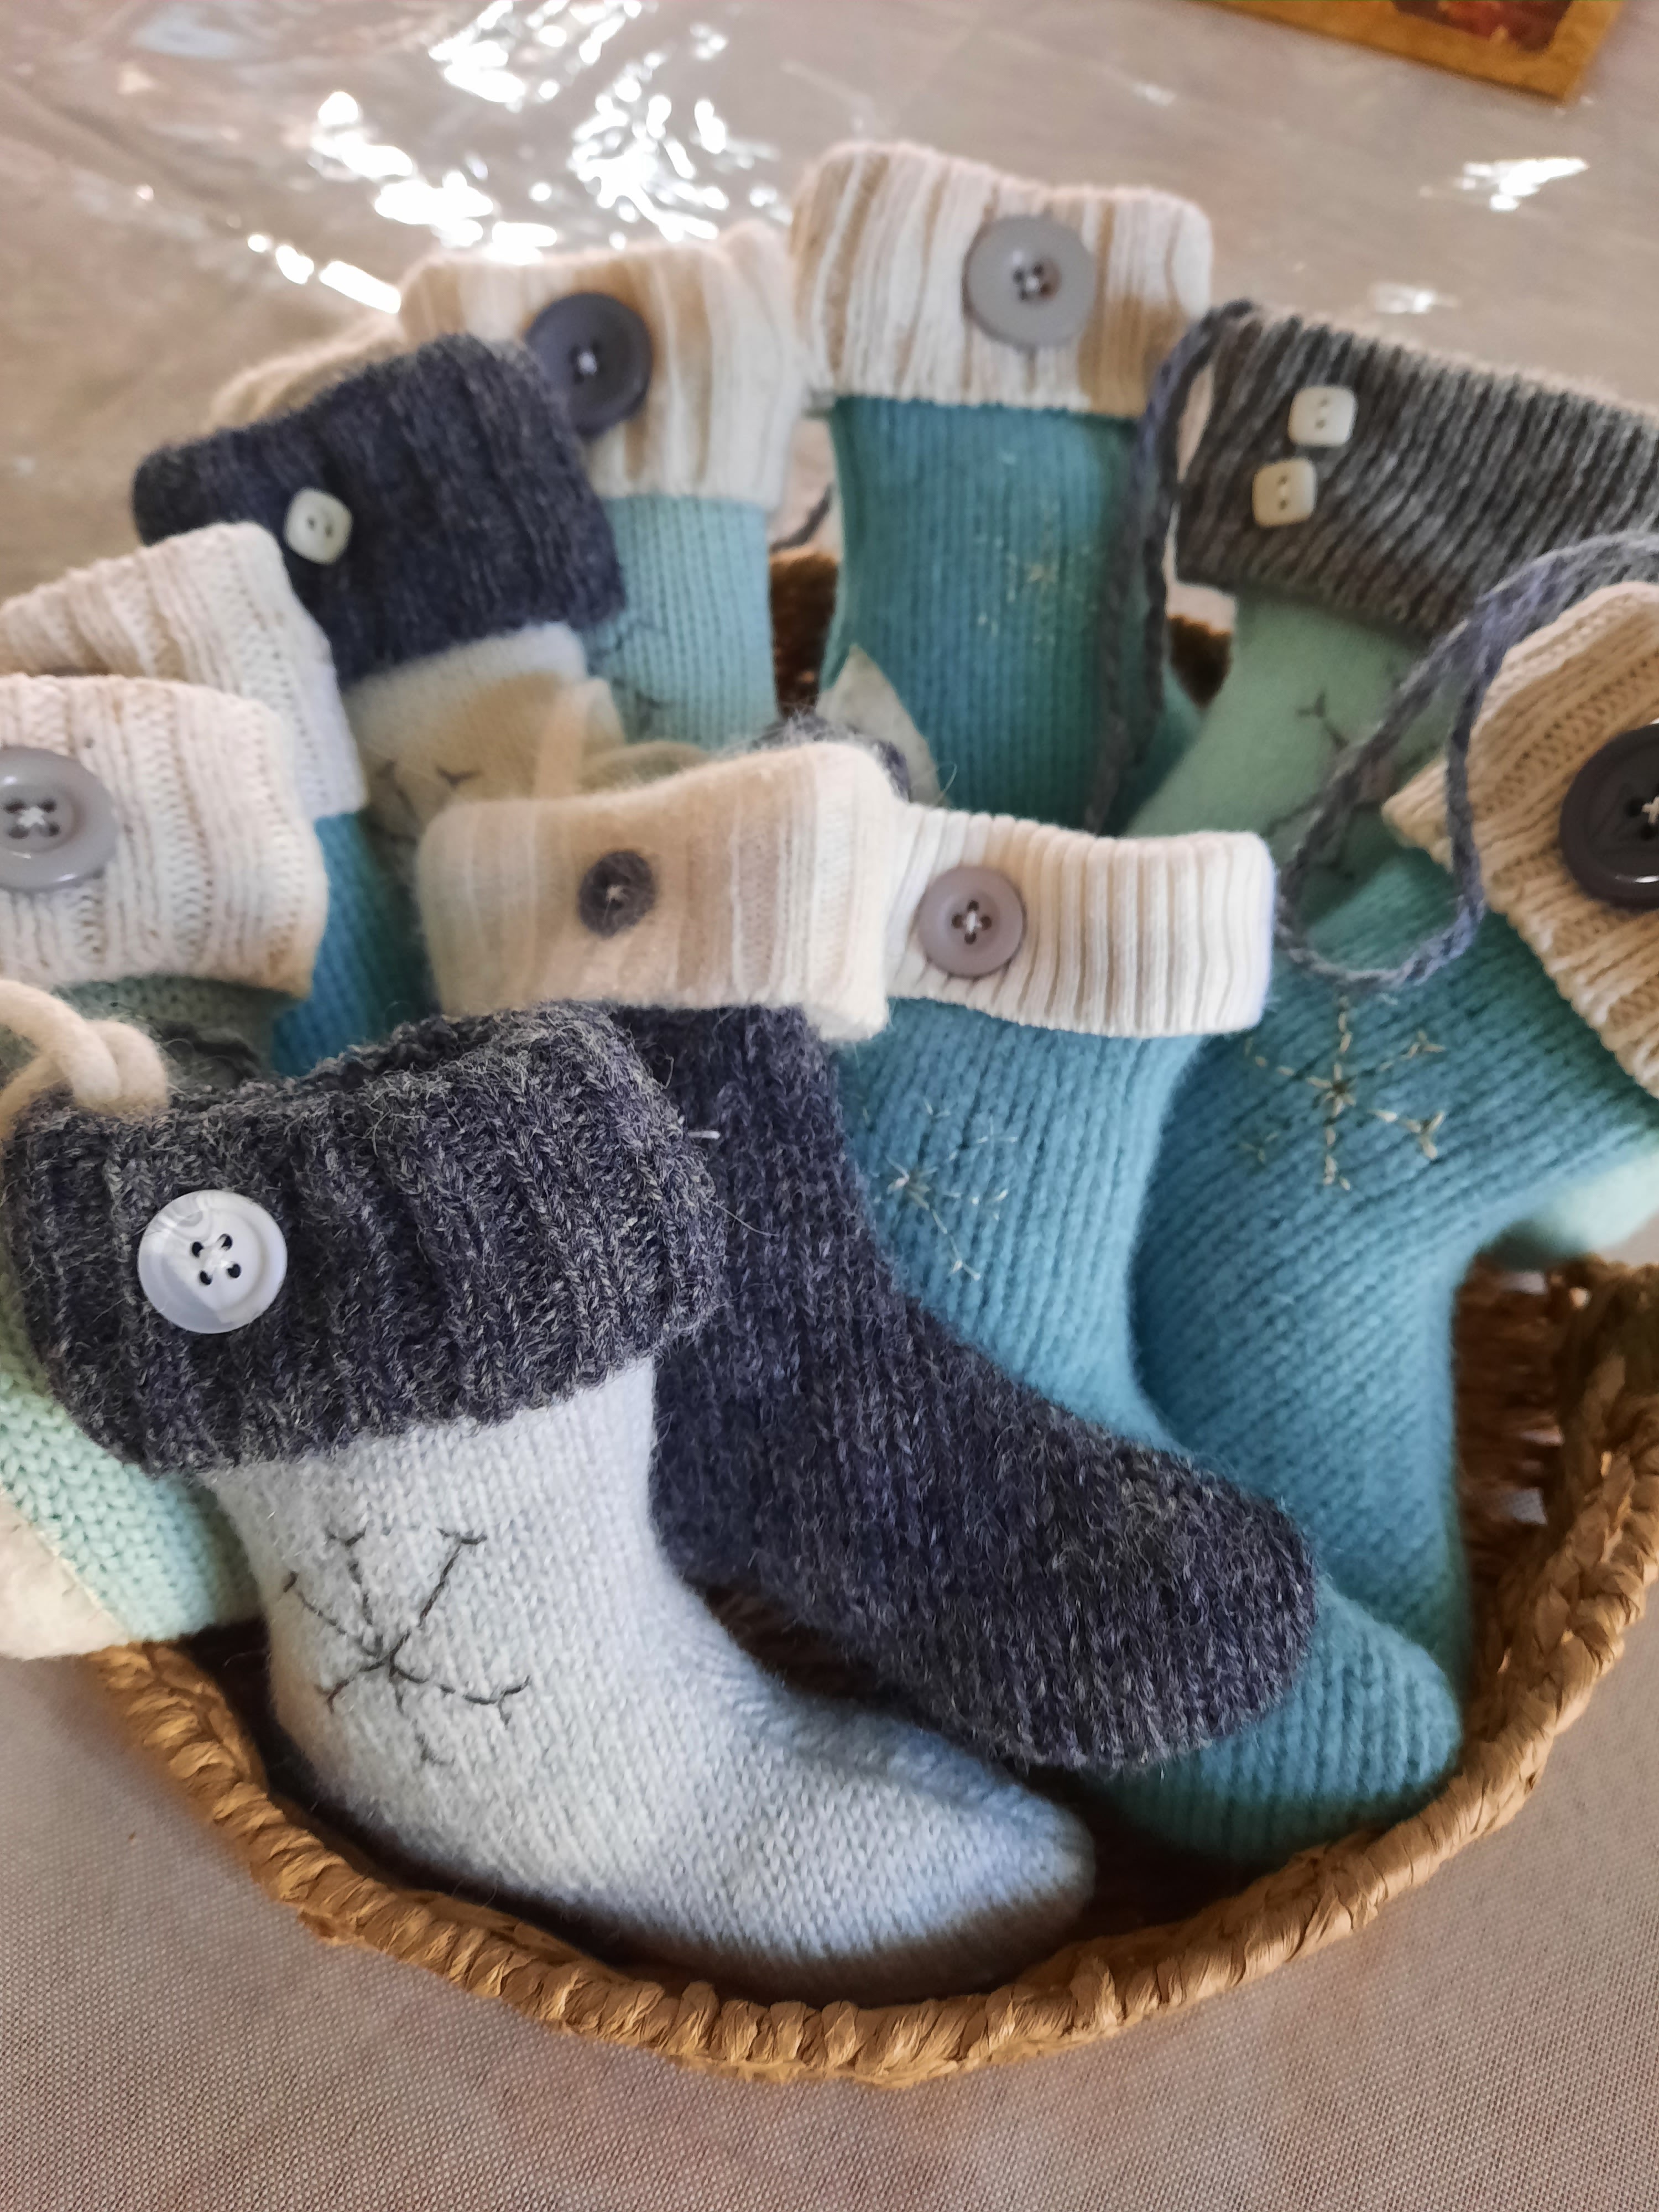
This time of the year I am always busy making things - gifts, crafts, decorations, etc, some to keep and some to give away for Christmas gifts.  Although I've made this stocking ornament a few years ago for my Ornament Exchange party, I saw more of these unfinished stockings cut out in my craft room stored in a bag (shoved in a box in the closet).   

Sadly, my craft room has lots of unfinished projects in it.  It's like the Island of Misfit Toys from the Rudolph movie, only instead of toys, they're craft projects that for some reason never got finished!  

So amidst all of the things that I am working on to get finished for Christmas, I put those things aside and took out the bag of unfinished stocking ornaments to work on!  

The stockings were cut from old sweaters using a Sizzix stocking die.  The top of the stockings are sweater waistbands and cuffs, removed from sweaters.  I did the embroidery, sewed the stockings and added the buttons and yarn to finish them!  I LOVE making things from used sweaters.  Whenever I'm out thrifting, I am always looking for sweaters to cut up. 

I put them in my Vintage shop to use and sell for the holidays.  

Well, at least I've finished one project.  


Sunday, February 20, 2022

Christmas Ornament Exchange

As you may know, every Christmas I host an annual Ornament Exchange party.  It's a fun time to get together with my crafty friends and celebrate the holidays.  Each person has to bring 8 homemade ornaments, all the same, for exchange.  They also bring appetizers, drinks and desserts and we have fun eating all of the goodies.  

This year my friend Tracy brought over a Hot Cocoa bar for us to enjoy.  It was fun setting it up and choosing the toppings for our cocoa.  

We always have such a silly and fun time together!  

This is Linda's first year joining in on the fun!  She made everyone a quilted ornament for the tree.  
Carol made some cute Buffalo checked mittens with a wooden snowflake and button attached.
Amy brought two kinds wooden bead ornaments that were strung on wire.  
Melissa made some deer ornaments using chipboard as the base.  


And Judy made some designer paper punched ornaments.


Tracy also made some pretty paper ornaments.  

And my contribution was these little quilted trees.

Every year we have such a good time.  We're already talking about what we can craft up for next Christmas!  

Do you participate in an ornament exchange?  Gather up some of your crafty friends and put one together for next year.  


Tuesday, February 15, 2022

Quilted Tree Wall Hangings & Matching Ornaments

If you remember, I made a couple of these quilted Tree Wall Hangings last year for Christmas gifts.  The pattern is from The Fat Quarter Shop and is called Charming Christmas.  You can watch the video on how to make here.  

While I was home on Christmas break this year, I made four more of them to give out as gifts.  They are each a little bit different.  I used fabric from Fig Tree called Christmas Figs.  All of the colors coordinate so beautifully.  For the gifts, each recipient received the wall hanging and some matching ornaments for their tree.

I made some little birds, which were so much fun to make, and some patchwork squares from the leftover scraps.  It's hard to see in the photo, but they have gold cording on them for the hangers.

I made MORE of the quilted trees (a lot more!) and gave them out, as well.  I love giving out handmade ornaments to people.  People tell me years later that they still have them.  :)

The wall hangings measure about 22" square.  Will I make more of them?  Yes, yes, yes.  I'd like to try some different color schemes and see how they turn out.  It's a great Christmas gift and doesn't take too long to make.

Back in November, I had the idea to make some ornaments from my grandbaby's handprints.  I painted her little hands with some green paint, cut out some linen squares for the imprint and attempted to get her handprint on the fabrics.  Needless to say, it didn't work out very well!  LOL  She kept trying to grab the fabric and we ended up with green paint everywhere - on the table, her clothes, my clothes, etc.  

After we washed her up, we took off her socks and stamped her footprint instead.  These came out so much better!  Look at her little face in the photo- "What are we doing here, Nana?"  

This is what I came up with for an ornament.  I made patchwork strips to sew around the linen, matching the green paint that I had used.  After I sewed the front to the back, I added some red floss stitches, embroidered her name and added a couple of little buttons.  So sweet, right?  I made two of them, one to keep and one to give to my daughter for Christmas.  
Maybe next year we will try the handprint!


Sunday, January 5, 2020

Making Buffalo Checked and Rustic Ornaments


This Christmas my daughter decorated with Buffalo checked decor.  It's pretty popular this year and the colors make everything look cozy and warm.  

To decorate her tree, I made some ornaments to go along with her theme.  I love the little Buffalo checked trees the best.  (And yes, I want to make more of these!)  I used a triangle ruler to cut out the shape and sewed them up, leaving a small hole at the bottom for turning and stuffing.  Then I inserted a stick and glued it in using a glue gun.  The bows are glued on and lastly I sewed some red jute to the top to hang them.
You can also see in the photo that I stamped a couple of rustic log slices also.  We made these a few years ago and I still had some log slices left over.  


I used the Snowman stamp from Snowman Season and placed him in the Snow Globe shaker dome for this ornament.  Then I added a Buffalo checked scarf from a thin piece of the fabric!  I had some checked ribbon so I added that to the bottoms.  Doesn't he look so warm and cozy in his checked scarf?

I remembered that I had some sweaters that I cut up to make projects with that were Christmas colors. I cut them out into heart shapes.  They're easy to make because the sweater material holds the stuffing nicely and you can keep shaping them as you fill them.  There's a small hole in the side for turning and stuffing.  I stitched that up, added the bows and some twine to the tops for hanging.  I definitely want to make more of these! I love anything made from receycled sweaters!


I found a nice box at Joann's to give to her to store the ornaments in and to complete the look.  She loved her handmade Christmas Tree Ornament Box!

Friday, December 28, 2018

This Year's Ornament Exchange

Every year in December I host an Ornament Exchange Party.  This year we had 9 ladies that exchanged handmade ornaments.  We all bring something to eat and then gather 'round for the Exchange.

Each person gets to tell the "story" of their ornament - how they made them, what was easy, what was hard, how they came up with the idea, etc.  You can make your ornaments from any craft medium that you choose.

There are always so many cute and creative things.  I love putting all of these handmade things on my tree each year and remembering who made them.  Look at this cute sled with pine boughs and ribbon embellishments!


Don't you just love this pretty ornament made with fancy papers and snowflake cut-outs in it?  Each one is different. 


Then we pass the ornaments around and each person chooses one from the basket.  They're all so pretty and interesting, it's hard to choose!


It's such a fun evening getting together with the Girls!  We look forward to it every year.


Aren't these cute?  Painted lids to jar candles and then when the candle is burned, punch a hole in the lid to use them as an ornament!  The idea is so clever.  It's a Reuse- Recyclable ornament.  :)


There were so many different snow scenes in a jar to pick from.  How festive is this little caroler in her woodland scene?


I wonder how many bottles of wine one of my friends had to drink to make these ornaments?  Ha ha - just kidding!


Pretty felt cut-out snowflake ornaments made with the Accu Cutter.


What a sweet look to these ornaments made from dried okra and acorns!  They are painted and assembled to look like they are straight from the Christmas Garden and Forest.


And golden stars always make your tree look traditional and festive.

It's so much fun!  We all can't wait to do it again next year.

Have you ever had an Ornament Exchange?  What are some of your favorite handmade things that you put on your tree?


Ornaments for the Ornament Exchange

Every year I host an annual Ornament Exchange.  About 8 of my crafty friends make handmade ornaments ahead of time for swapping with each other. 

This year I found the cutest fabric while I was away at the Houston Quilt Show in November.  Its by Cori Dantini and features small images in vintage colors.

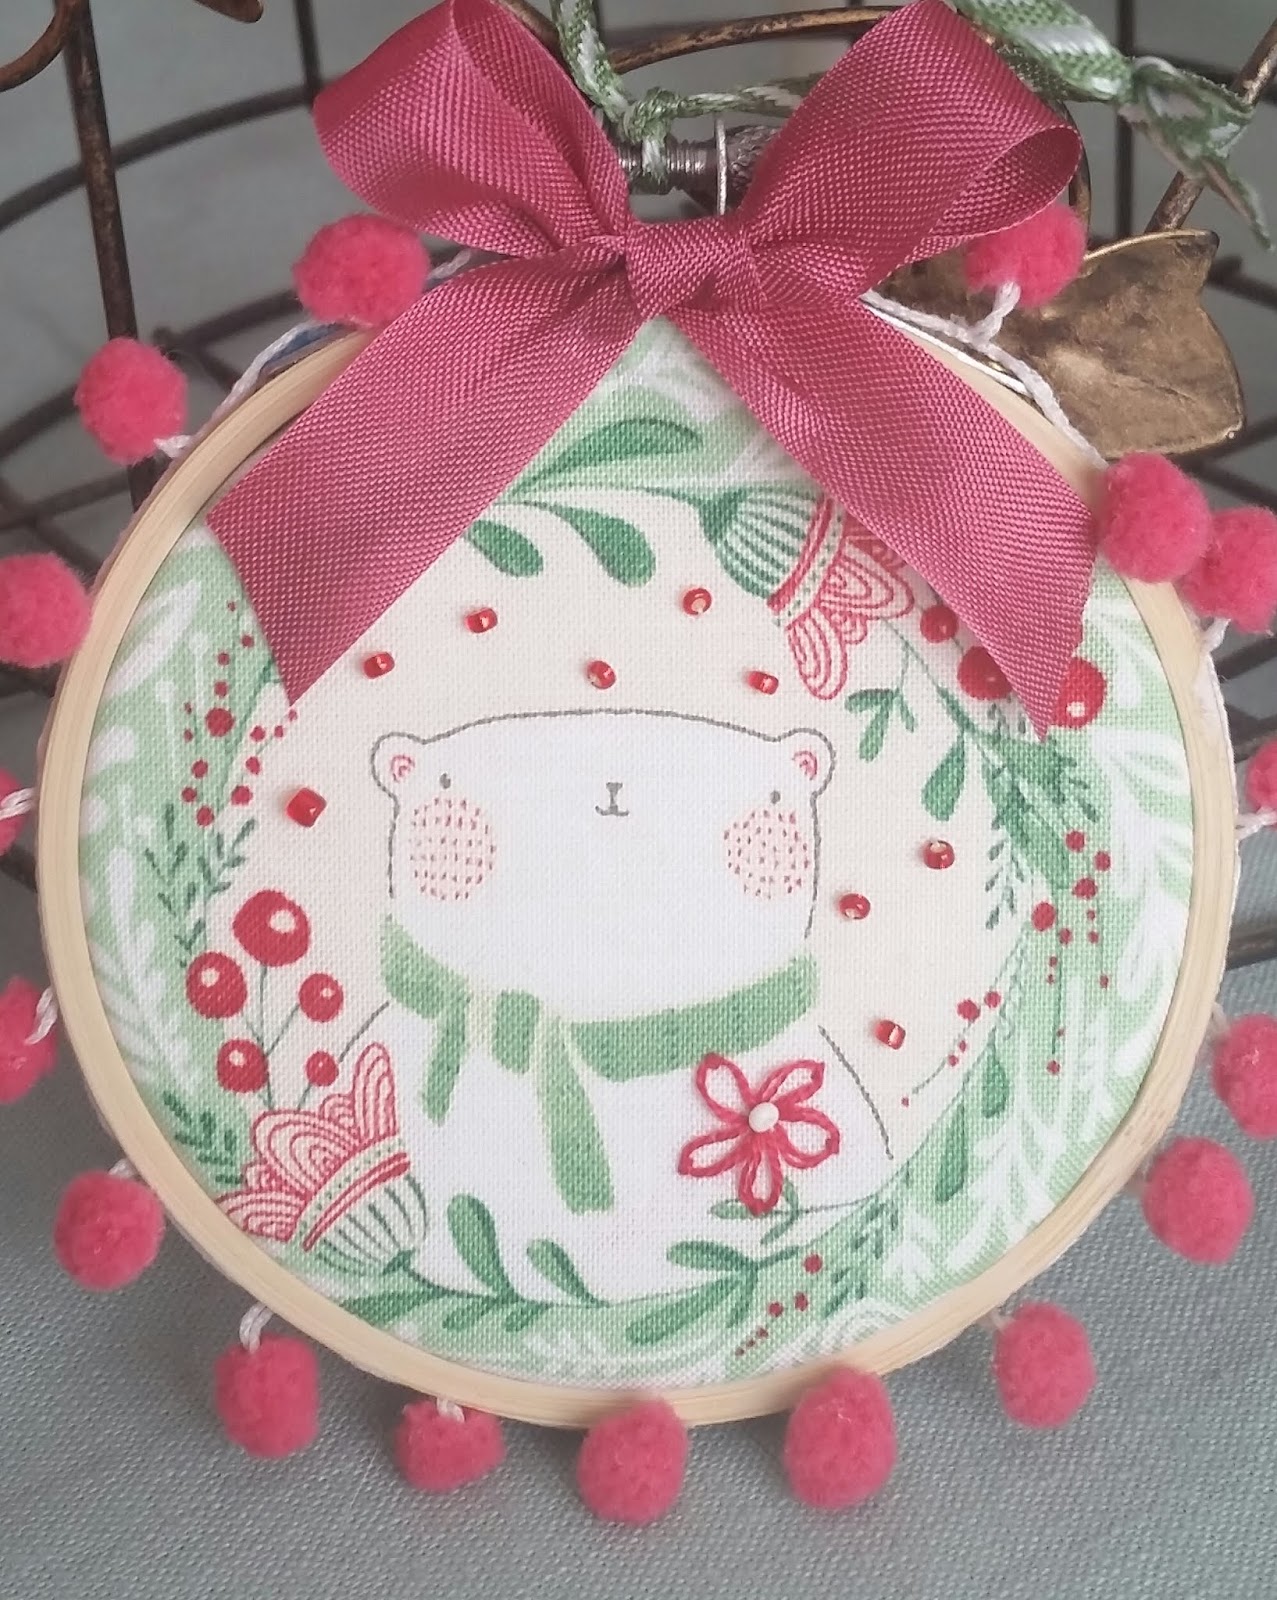
The images fit perfectly into a 3" embroidery hoop.  I had to go to several different craft stores to get enough hoops to make all of my ornaments.  Actually I thought that I had some, but couldn't find them. (!)

I added some embroidery using matching floss to each piece and made some lazy daisies on each one. 

I sewed on beads and buttons in clear, white and red to give them some dimension.  The back has stabilizer on them so the threads don't show through and then a piece of white Christmas tone-on-tone fabric to finish them off nicely.

I glued on matching pom pom embellishments to the edges and added ribbons for the hangers and to decorate the fronts.

There are so many cute images, I'm not sure which one that I like the best-  Santa, angel, tree, bear, bird and a snowman.  They were a lot of fun to make. 

Which one do you like the best?