Friday, December 30, 2022

The Red Chandelier Quilt is Finished!

I guess I can say that I call myself a "quilter."  In reality, it's more like a "quilt starter."  I like to start new projects, select the fabrics and begin making the quilt.  It's so exciting in the beginning to see how your fabric will come together as a quilt. But then life gets in the way, I get busy with other things, set the project aside and they don't get finished as quickly as I'd like.  

But photos don't lie, and here is a completely finished quilt!  (Cue the band music here.)  I finished this quilt in time to give for Christmas, even though it's actually a birthday gift and her birthday was in October.  But let's not worry about that - it's finished!

The quilt is a pattern from the Missouri Star Quilt Co and you can find the tutorial here.  It's not that hard to put together, but you need a design wall if you are making it with "random" colors.  

My friend Amy, who will be getting the quilt, loves the color red.  So I selected some beautiful reds from a few different collections that I had picked up to make her quilt.  There's some Poppy Mae fabrics from Moda and Little Sweetheart fabrics by Edyta Sitar.  

For the background, I wanted a soft creamy fabric with monochromatic images on it, but I couldn't find what I was looking for when I was ready to start her quilt.  I ended up getting a small yellow dotted fabric from Riley Blake called Le Creme Dots.  

You don't really notice the dots, and the cream color just gives this quilt such a soft look.  I love how it turned out!  I got extra Le Creme fabric to use for the background of a few more quilts.  

I have wanted to make (finish) a Chandelier Quilt for a while now and I'm so happy that it's done!  It's the first quilt that I've finished in 2022, but there are still a couple of days left, so you never know, there may be more.  Perhaps 2023 will be the year of finishing quilts, not just starting them.  There sure are a lot on the UFO pile.  :)


Crochet the Grinch?

For Christmas this year, my son Jamie come to visit with his new girlfriend.  I asked him what she liked and he said that she like all things "the Grinch."  I thought for a while what I could make for her and found a pattern to crochet the Grinch on Etsy.  

Honestly, I thought that he came out so cute!  He came out a bit bigger than I thought he would, but if I make him again, I will use a smaller crochet hook.  If you'd like to try crocheting him, the pattern link is here.  The pattern was easy to follow.  

So did she like him?  


Yup, she did!  

Jamie is holding Chewbacca that I crocheted for him.  It came out a little bit weird looking but he liked it anyway.  :)

Ornament Exchange Party 2022

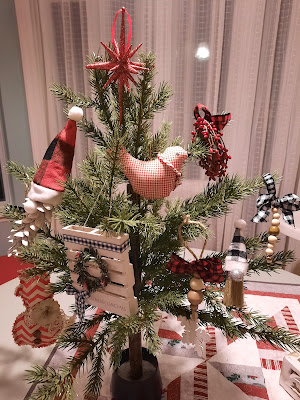
Last week my crafty friends and I gathered for our annual Ornament Exchange.  We have so much fun every year!  We don't tell each other what it is that we are making, but this year most of the ornaments coordinated so well together.  :)

The ornaments have a very homespun look to them.  See how they all go together?  

Melissa made her ornaments out of mini palettes that she purchased from the Dollar Store.  Then she added ribbon, a wreath, mini bulbs, a stamped saying and a bow.  How cute are they!  I love the mini palettes and their homespun look.  :)

I think the palettes make a nice base for an ornament.  Now I'm thinking of what I could do with them, too.  :)


Judy made her gnome ornaments using pinecones and paintbrushes!  I love how she made two different sizes of gnomes for us.  They are adorned with cute little hats to complete the look.  How sweet :)


Next up is Linda with a cute beaded snowflake ornament.  And look how she also used the buffalo checked ribbon for hers.  I love how they all coordinated together!


Tracy did some sewing for her ornament and made little red snowmen for us.  They came out amazing!  (And we didn't really know that she could sew.  LOL)  


Amy presented us with two ornaments, also.  A sweet beaded icicle and a pretty red wreath.  All with a homespun look them!  Nice job, Amy.  :)


Carol brought some glittery sparkle stars in red and silver.  I love all of the ornaments.  Every year it's so much fun taking out all of the homemade things and remembering who they are from.  What a great way to share our crafts with each other during the holidays.  


And here we are, my group of crafting friends.  We treasure our times together.  Merry Christmas!


Tuesday, December 20, 2022

Making Birds for the Ornament Exchange

Every year at Christmas time I host an Ornament Exchange Party.  Seven of my crafty friends each make 8 handmade ornaments and then we exchange them at our party!  This year I decide to make some Christmas birds for my exchange.

Although I have made little birds before, I lost the pattern and had to find a new one.  So these little birds are made using the Sizzix bird pattern.  They are a bit smaller but are just as cute!


I painted some beaks and eyes onto them using a charcoal paint.  For some of the birds, I crocheted a little red and white scarf and for others I glued on some flower embellishments and poinsettias.  Then I sewed a thin gold cord so that they can hang on the tree.

The birds are made using Fig Tree Christmas fabric.  Each bird is a little bit different and that makes them so special.  

I made extra birds so that I can give them out as Christmas gifts.  My crafty friends just loved them.  Of course, I want to make MORE.  (They're like eating potato chips; you can't just make one!)

I put them in a two-tiered tray that I picked up at Target.  I think they look so cute!  


Monday, December 19, 2022

Matching Aprons

Last week while I was shopping at JoAnn's I came across this cute Susan Winget fabric with little snowmen on it.  I just couldn't pass it by even though I may or may not have a lot of Christmas fabric in my stash.  

I thought it would make cute aprons for my daughter and my for g-baby, who is now 1 1/2 years old.  I can't wait to give the aprons to them.  They are reversible if you want to just wear the red side for other holidays.

There is still a lot of this fabric left over so I might make for me, too.  Then we will all be matching.  :)


Saturday, December 3, 2022

Patchwork Tote Bag & Christmas Miniature in a Mug


One of my craft-loving friends, Cindy, is going to be moving to TN in a few weeks.  Cindy and I have gotten together to make crafts for several years now.  She is the Crafting Queen and knows how to make all kinds of crafts.  

For her going-away party, I wanted to give her something handmade.  So I did some embroidery and made her this sweet little tote bag with a gathered top.  The bag will make a nice little carrier for taking a small craft project along with you when you are out and about with some time to spare.  I got the pattern from an older book that I have called Patchwork Love Embroidery by Gail Pan.  

Cindy just loved her tote bag. She likes vintage items and muted country colors in her projects and in her home.

 I gave it to her at one of her crafting days that she holds at her church once a month.  


This month we made a sweet festive decoration using a mug and some greenery items.  Here is a photo of the one that I made.  

I added a little house that I painted and a small white picket fence.  I love how it came out.  It only makes me want to make like 20 more of these.  

Although the mugs came out lovely, we made a lot of mess while we were working on them!  There is styrofoam in the cup to hold the twigs and moss.  The rest of the items are glued in using a glue gun.  Depending on the mug that you choose and what you have to put in them, the projects can come out quite differently from the one that I made.

It would be fun to collect some new miniature items from thrift stores to put in my next mug.  :)

Here is another photo of my project. I already have it out on display with my Christmas decorations.  I just love how it turned out.  

Thanks for the idea, Cindy.  Next trip, off to TN to visit Cindy and what sort of thrift and craft shops she will have in her new town.  


Stocking Ornaments from Sweaters

This time of the year I am always busy making things - gifts, crafts, decorations, etc, some to keep and some to give away for Christmas gifts.  Although I've made this stocking ornament a few years ago for my Ornament Exchange party, I saw more of these unfinished stockings cut out in my craft room stored in a bag (shoved in a box in the closet).   

Sadly, my craft room has lots of unfinished projects in it.  It's like the Island of Misfit Toys from the Rudolph movie, only instead of toys, they're craft projects that for some reason never got finished!  

So amidst all of the things that I am working on to get finished for Christmas, I put those things aside and took out the bag of unfinished stocking ornaments to work on!  

The stockings were cut from old sweaters using a Sizzix stocking die.  The top of the stockings are sweater waistbands and cuffs, removed from sweaters.  I did the embroidery, sewed the stockings and added the buttons and yarn to finish them!  I LOVE making things from used sweaters.  Whenever I'm out thrifting, I am always looking for sweaters to cut up. 

I put them in my Vintage shop to use and sell for the holidays.  

Well, at least I've finished one project.  


Snowflake Wishes


 Today I wanted to make a card using Snowflake Wishes.  I got this set last year but didn't get to make as many projects with it as I had wanted.  I like cool Balmy Blue and Gray Granite colors on the card.  It has a nice wintery look that can be used beyond the holidays.

For this first card, I used Balmy Blue for the background that shows under the snowflake cut-out.  I love how the card turned out but after I made it, I remembered that I had some blue glitter paper and I wanted to give that a try on the card.

It's hard to see the beautiful sparkle that the glitter paper gives to this card in the photo.  It's so pretty in real life.  Here you can see that I didn't use a Christmas saying on this card so that I can send it anytime over the winter months.  And here in upstate NY, that's like half of the year.  LOL

I got the idea for this card from Cindi Copeland on Pinterest, one of my favorite place to be.  


Peace to You at Christmas


 While I was browsing on Pinterest (a great site for all sorts of craft ideas), I spotted a couple of nice cards made using the Peace to You set from Jackie Bolhuis.  Then I had to get the stamp set!  LOL  

I made this church scene card using Night of Navy ink.  I used the Stamparatus to get a good image onto my white cardstock.  Then I trimmed it with a rectangular cut out and added some ribbon to the background.  I used the Merry Melody embossing folder for the background.  

I love the simplicity of this card.  

For the second card, I stamped Mary and Joseph using the Stamparatus, also.  I trimmed the image and added it to the card using dimensionals.  

You can use pretty much any Christmas saying with this card.  Again I used the Merry Melody embossing folder for this card also.  I love making whimsical cards, but I also love the sweet reminder of what Christmas is all about in this card.  


For my third card in this set, I took out an older set called Night of Bethlehem.  I've had it for a while but haven't used it yet.  I thought it would make a good addition to these other two cards.  The card is a fancy fold and I love how you can almost imagine Mary and Joseph on their journey to Bethlehem as the card opens.

Here is what the inside of the card looks like.  I used an old designer paper called Maritime that had constellations on it that looks like the night sky.  Kind of cool, right?

I cut out the town of Bethlehem out of the cork paper and I just love the look of it.  

To finish off the card, I used the coordinating dies to cut out a gold star for the sky.  I saw the idea for this fancy fold card from Patty Bennett.  

I just love this set of cards.  I'd like to try the Peace to You in another color.  Have you tried this set yet?  Did you have to use the Stamparatus to get the image to stamp well?

Thanks for looking at my cards.  Drop me a comment if you like them.