Monday, April 24, 2023

Full of Love Cards

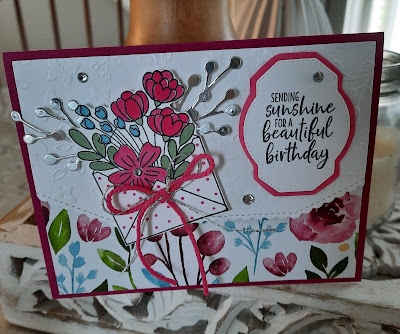
Full of Love is a sweet stamp set that sadly is retiring.  It includes stamps that look like envelopes and letters with flowers just bursting out of the them.  It makes a nice get well, sympathy or thinking of you card.

Card #1 features the pretty papers from Awash with Beauty.  For the first card, I chose the pink side of the paper for the front of my card.  I added a white top to look like the top of an envelope using the Basic Borders die cut.  I colored in the image with Blends and added it to my card with dimensionals.

This card is the same card, only I turned over the designer paper to show the pretty flowers on the other side.  The sayings are from Welcoming Window stamp set.  I got the idea for this card from Julie Gilson.

My second card is made using a template from the Split Textures die cuts.  I laid the template down onto my cardstock and sponged some pink ink through the openings.  Then I reversed the cardstock and did the opposite side. (The die is diagonal and would only cover half of the card.)

I added the envelope image, stamping it twice and cutting out the small envelope and raising it on the image to give the card some dimension.  I added the black checked ribbon and did some white embossing onto a black cut out.  The saying is from Eclectic Garden set.  

This car is pretty much the same, only I added some yellow colors to the flowers and a different saying.  I got the idea from Tammy Wilson.

For my third card today, I used some papers from Awash in Beauty for the background.  I added a green circle and a vellum shape for a focal point.  For these flowers, I painted them using a paint brush and the ink from the stamp pads.  The flowers have Wink of Stella on them to give them some shine, but you can't really tell from the photo.  

My second version of this card has a Happy Mother's Day saying on it.  I may send this card to my daughter, who is a great mother to my sweet g-baby.  This idea came from Melodie Viljoen on Pinterest.  

After my class, I made a bunch more of these cards to have on hand.  Which card is your favorite?  


Monday, April 10, 2023

Nested Friends Trio of Cards

This week's stamping class featured a stamp set called Nested Friends.  (There's only one bird image in it, so I'm not sure why it's called nested "friends.")  I paired it with Honeybee Home and made three cards.

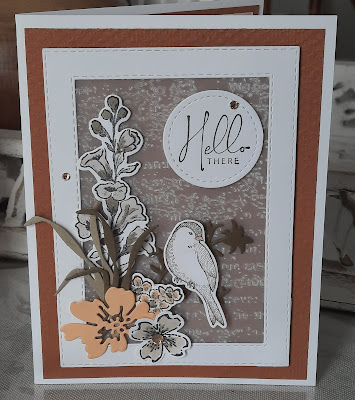
The idea to make this first card is from Gail Ellis on Pinterest.  I like a lot of her designs and use of color.  The background is Cinnamon Cider and the white frame is made using the Stitched Rectangle dies.  I embossed a piece of vellum with the Timeless Texture folder and adhered it to the back of the frame.  Then I put it on my card using dimensionals to give it some lift and interest.  

The flower is from Honeybee Home, as well as the the sprigs.  One of the flower cut outs is acting like a little branch for the bird to sit on.  The flower cut out is from Hand Penned dies and the tan flower is from Regency Park, using the punch for the trio of flowers.

Hello There sentiment is from Nature's Prints.  I love the soft, look of this card.  

For the second card, I used Blushing Bride cardstock, with a layer of embossed white and some papers from Abigail Rose papers.  I added the nest and the bird from Nested Friends along with some cut out eggs that I speckled.  The oval frame is from Framed Florets.  The saying is from Honeybee Home and the flower is from Regency Park.  I got the idea for this card from Kim McGillis.

The third card uses more designer papers from Abigail Rose and the cut outs from Nested Friends.  The pink sprig is from Honeybee Home and the flower from Regency Park.  This idea is from Julie Gilson.

I have to say that I love all of the new products from Stampin Up.  They make paper crafting such a pleasure.  You can mix and match the stamp sets and the dies for truly amazing cards and projects.  I am so glad to be a part of the Stampin Up family.  

This summer will be 20 years for me.  Crazy, I know.  


Sewing Retreat at My Home

Four years ago, before Covid, I decided that I wanted to do a Sewing Retreat in my home every year, like an annual event.  March is a good time to have one, it's not too cold, and yet not nice enough for people to be out in their own yards.  

This is the second "annual" Sewing Retreat, with three years in between the first and the second.  

I invited some of the ladies who come to my sewing class and some of my friends that love to sew and quilt.  For two days, from 10-4:00 pm, we chatted, laughed, exchanged ideas, sewed and ate together!

Here's a pic of me finishing up the table runner for my niece.  I was able to work on a couple of UFO's and get them done.


Each of the ladies sewed a current project or finished up an older one.  I loved seeing how different the projects are that everyone was working on.

Everything from baby quilts to block of the month quilts and more!  One of my friends even brought over her old Singer featherweight that comes in its own box to sew with.


Each person brings their own lunch and then we take a break to all eat together.  

It was a great weekend.  One of the ladies asked if I could do it once a month.  If only they knew, it's pretty much what I do here all the time.  LOL


I look forward to our sewing retreat next year!


Quilted Green Table Runner and Wedding Frame

Back in March I posted a quilted gray star table runner that I made for my niece for her wedding. However, I didn't really think that it went with the stamped gift that I made for her.

So I went back to my craft room and made another one!  This time I used some soft greens that I thought would look nice in her new home in FL.  

I used some light green scraps that I had along with a beige leaf print for the background.  I also made the blocks just a little bit smaller.  I love how it came out!  After making it, I thought that this would make a nice runner for my own table. Lol

My niece and her her new husband like the outdoors and like hiking.  So I made this stamped frame for them.  I used In the Pines stamp set to create a mountain scene and kept the same green colors for the embellishments.  The accent colors don't really show up in the photo, but they are gold.  I picked up the shadow box frame at Michaels.

To coordinate with my gift, I made some 3" x 3" love notes for her to give to her new spouse with the mountain theme.  I mailed off her gifts a couple of weeks ago and they both really like them!  

Which runner do you like better, the gray or the green one?


Coral Table Runner

 A few years ago I got an assortment of coral colored fabrics in the Sew Sampler monthly subscription box for people that love to sew.  I had subscribed to the box, which I absolutely loved, but hardly ever made the projects or used the items.

So finally, I took it out and made a dresser runner for my bedroom.  Last year I switched colors from teal to coral to add some pizazz to my room.  

I started out by cutting the 5" strips into 2 1/2" pieces.  Then I sewed them all together until the piece was about 64" long.  I wanted it to hang off of the side of one of the dressers in my room.  

Then I added a light gray border along with another coral border to make it wider.  The next border is made using 5" x 3 1/2" strips cut from some random collage-type fabrics that I had.  

I wanted to do a sort of zig zag quilting on it and used a setting on my machine for it.  I didn't measure where to put the zig zags.  I pretty much just eye-balled it.

I love the zig zag and how it all turned out.  It took about 2 hours to do the machine quilting to finish up this somewhat easy table runner.


To quilt it, I rolled up each end and clipped them using clothespins to keep the ends from unrolling.  This seemed to work very well.

Finally, for the border, I added a soft gray color to it.  Here is a pic of it in my room on the dresser.  

This was a fun and easy runner.  And weirdly, it could be hung on the wall if you had an empty vertical space that needed something.

Next up, I want to make a wall hanging with birds on it using the same colors.  We'll see how it goes!

What do you think of this simple runner?  Do you have a space that needs "filling?"


Easter Cards & Magnets

When I first got the Mini Catalog, I wanted to get the Easter set with an image of Jesus in it.  I have a lot of rubber stamps, but I've never had one of Jesus.  

For my cards this week, I paired the Fancy Flora designer papers with Rejoice in Him.  This card is my version of the one in the catalog.  I added the sprig and some cut out flowers from the Queen Bee dies to my card.  The saying is embossed and Jesus is painted using the ink from the stamp pads.  I love the peaceful look of this card.  :)

After I started playing around with the Fancy Flora papers and the image of Jesus, I decided to make some Easter magnets for the ladies in my Bible study.  I have to say that you can't just make one of these!

I tried using different sheets of the designer papers and just loved the looks that they made.  So I made more!

I ended making a whole basket full of them!  I used metallic scraps that were sitting around and some of the cards are embellished in gold and some in silver.  I put the little cards into magnet holders that I had purchased from Christmas Tree Shops.  I love how they turned out.  :)

For my next card, I selected a paper that was a bit brighter.  I paired it with blue cardstock (this is Brilliant Blue, ha ha, a much older color that matched it!).  I also used a piece of gingham paper from the Country Lane pack.  The same sprig is used, cut from a piece of designer paper to complete this look.  You could really put any saying on this card.  It would not have to be for Easter.


Lastly, I made a pocket card using the purple papers from Fancy Flora.  I got the idea for this pocket card from Stamp It Up With Jaimie.  I love the font and sayings in the Rejoice in Him set.