Monday, March 13, 2023

Queen Bee is the Bee's Knees

When I first saw the set, Queen Bee in the mini catalog, I knew that I had to have it!  I love the detail in this bee stamp.  :)  For the first card, I made a fancy fold and used the papers from the Delicate Desert designer papers.  

I stamped the bee and also cut out an extra set of wings to match her.  I used the flower dies from the set and cut them out in silver paper.  The sprig is also from the set and I love how it all comes together.

I also used the print stamp to make the card look like a "collage" card.  She is so much prettier in real life, but who wouldn't want a card that lets them know they are the "Queen Bee" of their own life?

I got the idea for my three cards from Gail Ellis on Pinterest.

The next card appears to be a bit more collage-looking.  I told the ladies who come over to stamp that you can keep adding more things or keep the card simple.  That's the fun about the collage cards.  All of the pieces and embellishments can be interchangeable, too.  

I paired the Bee with Nature Prints stamp set and dies for my cards.  On this card, I used the wreath from the Natural Prints dies.  

For my cards I used a mixture of different greens to give them a nice green/gray look to them.  

For the third card, I embossed the bee in silver.  But after I made the card, I tried using the gray emboss powders and I liked the look of that better.  I used Nature's Prints for the center section of the card.  It's hard to tell in the photo, but for the background I used a subtle embossing folder to give the card more texture.

I think the Bee can be very versatile, depending on how you use her.  Change up the color palette (rust and corals) and you will have a totally different look to your cards.  

For the final project, we made desk calendars.  I know it's already March (!) but everyone was excited to finally get a calendar.  :)

Here's a pic of some of the ladies working on their Bee cards.  


What sort of things have you done with the Queen Bee?  


Saturday, March 4, 2023

Framed Florets Cards

For my last stamping class, we took out the stamp set called Framed Florets.  I've had it for a while, but finally got a chance to use it.  Honestly, it's so versatile that it's definitely something that just have to have if you like to make cards.

We started with this pretty side-fold card that uses the heart frame in the die set.  I saw the idea for this card from Jenny Hayward on Pinterest.  I used the papers that originally came with the suite for this birthday card.  We first cut out the hearts on a narrow piece of paper and then added the designer paper to finish the front of the card.  

Then we added ribbon, some cut-outs from the paper and a sprig that is also part of the set.  I used an oval stitched frame for the saying.  I love the font for each of the sayings, too.  This card can be made over and over again, each time using a different paper and different saying.  The only thing that is stamped is the saying.

For the second card, I started with black cardstock and added a Petal Pink layer and then some black checked paper.  I added a scalloped edge to the side of the layers to make it look more feminine.  Then cut out the pretty frame (I call it the Sleeping Beauty mirror frame) and added it to the card.  The flowers are all cut from the designer papers.  

I added a couple of sprigs and cut-out leaves, a bow and some rhinestones.  I used Wink of Stella to highlight the flowers and make them shine.  I saw the idea online from Mo Roots, another demonstrator.  

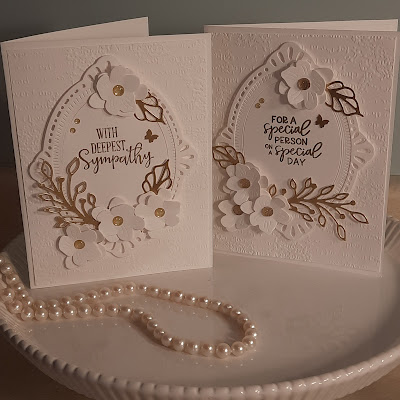
For the final card, I chose to go white-on-white.  I don't usually go for the all-white look, but this time I thought it lent to the beauty of the card.  I embossed a white background using the Timeworn Type emboss folder.  Then I added the "Sleeping Beauty" die with dimensionals.  I cut out another oval and taped them all together on the back so that the card wouldn't fall apart or lose its shape.  

The sprigs and leaves are cut out in gold and the flowers are dies from the Cherry Blossoms die set.  I added gold embellishments to the flowers.  The sayings are heat embossed using gold powders.  JoAnn Hewins made the original card.  

These cards all came out so different from each other, and yet so beautiful.  I plan on using the gold card to give to my niece, who is getting married soon.

Have you used this stamp set and dies?  What did you think of it?  I can't wait to make more cards with it.  


Quilts in Progress

While on the Quilt Retreat, I brought a couple of quilts that needed some work on them.  This first quilt is made from a Jelly Roll that had pretty reds and pinks in it.  I made a row of pinwheels to break up the stripes, but I wanted to add more pieces for some visual interest.  So I'm adding in some different sized pinwheels to give it more pizazz.  

I did finish the quilt top at the retreat and now need to quilt it.  I hope to finish it before next Christmas so that I can have it as a red throw.  

The next quilt that I brought to work on is another Chandelier Quilt from Missouri Star.  I finished up a red one to give to one of my friends at Christmas and now I'm onto a more spring-like look.  This quilt has several greens, yellows and sunflowers in it.  I hope to finish it in the next few months to give to someone special.  :)

Part of the fun in going on the retreats is to spend time with other ladies that love quilting.  We have show and tell, and share the ideas for our current and next projects with each other.  Now there's even more projects that I want to make!

We spend some time outdoors going on walks to get some fresh air and enjoy some wonderful meals together.  I can't wait for the next retreat!  When is it, again?


Fall Pumpkin Runner

While on my Quilt Retreat, I finished up this Pumpkin Table Runner.  I had started it a couple of years ago, but didn't finish it.  I love the colors in it and I'm sure that I will glad to have it complete when fall rolls around.  

The pattern is one that I worked up myself.  It has some oranges, browns and creams from my stash.  It could be hung on the wall, too, if I can find just the right horizontal spot for it.  

This past fall I started a couple of pillows using the same pattern.  I wish that I had brought them with me, too, and finished them up.  And I'd like to make a fall quilt or two.  Maybe next fall I'll get them done!


Charm Square Tote Bag

 Another project that I worked on at my Quilt Retreat was this Charm Square Tote Bag.  I started it about 5 years ago at one of the retreats.  It's a pretty large bag and I wanted to use it for bringing my projects to the retreat in.  

I had seen one made by one of the ladies and wanted one for myself.  But over the years, I lost the pieces to complete it and it sat in the Unfinished Pile.  

The original pattern that I had looked at online had buttons at each of the intersecting squares.  I still want to add buttons to my tote, I just need to find them. (Ha, ha)  I also want to add a stiff bottom to the bag.  Maybe I'll get some plastic canvas or some foam board to put in it.  I may even put ties on the side so that you can gather in the edges.  Here is the original post if you want to take a look at it.  (My tote is larger.)

This will give you an idea of how large the bag is.  When I showed it all of the ladies at the retreat, they all wanted to make one, too!  Actually, they wanted my tote, but I showed them where to find the pattern.  


Winter Quilting Retreat & My Carpenter Star Wall Hanging

During February, I attended a 4-day quilting retreat at a local conference center.  I brought along a lot of projects to work on and finish up (story of my life!).  

It was a wonderful weekend at a beautiful place with 16 other women who were working on their sewing and quilting projects, too.  

The first project that I finished was a Carpenter Star wall hanging that I started a few years ago during covid.  The pattern is from Missouri Star and was a lot of fun to make.  I used Corey Yoder fabrics from a couple of charm square packs - Strawberry Jam and Canning Day.  

Here is a close up photo of it.  I love how the different colors all work together.  I would definitely make another one of these.  By altering the size of the half-square trianges, you can work this pattern in any size.


I still have more fabrics left over from this project.  Who knows what I will make with it.  

I hung the wall hanging in my family room.  But I may find another place for it.  It's the perfect size to fill in a wall space.  :)


Another Zippered Bag

One of my friends that attends the Bible study at my church has been going through a tough time.  The ladies in the group decided to each bring in a small gift for her and we would put them all together in a basket to give to her.  


I picked up the basket from Marshall's and made a medium sized zippered bag to give to her.  Not knowing what others would give to her, I used colors that matched the basket for my gift.  

This is another of my "go-to" gifts that I like to make.  I picked out some soft cream fabrics and I like how they went together.  The bag is made using 2 1/2" strips that are quilted.  I like putting the zipper in the top part of the bag instead of at the top.  This makes the zipper look better on the bag.  

I picked out a card for her that matched the colors that I used.  

All of the ladies put a gift into the basket and it looked amazing!  Our friend was so grateful to receive her gift and know that we are all thinking of her this week.  :)


Gray Star Table Runner

When I need to make some gifts, I like to make table runners.  This is one of my "go-to" patterns.  It's a Star Table Runner that works up very nicely.  

I was working on some gifts for my niece who is getting married and thought that a neutral table runner would work.  

But honestly, I think this one is very gray looking!  I wanted make something that didn't stand out so that it could be used for any room or holiday.  Even though I like how it turned out, I am going to make another one.  LOL  


Stay tuned for next week to see what I come up with!  What will I do with this table runner?  I'm not sure yet.  I might use it for myself or give it as a gift.