Tuesday, November 23, 2021

On Stage at Home


Every year Stampin' Up has an annual conference to encourage the demonstrators and to welcome new items coming out in the catalogs.  I love attending these events.  There are always lots of various demonstrations that showcase the new products and you can get ideas on how to use the new things.  


This year my downline, Tracy and I met at her house to attend the virtual conferfence.  We really wanted to go in person to the event, but because of Covid, they held it online again this year.

We had a great time using some new stamps and papers and getting a sneak peak of what's to come.  We're excited for another year of stamping fun!  A few times a month, we gather together in my home with my stamping friends and make cards and other projects.

It keeps me in the creative mode and allows me to be with friends that share my interests.


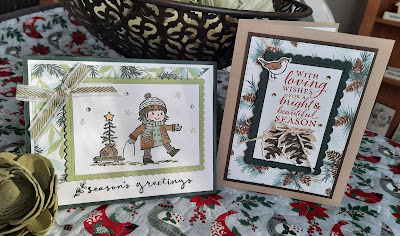
Here are a couple of cards that I  made using one of the new sets.  


While it wasn't exactly walking across the stage to get our awards, we made the best of it!  


Cheers to another year with Stampin' Up!  


Still More Christmas

We're back to the cloche!  Only this time, we're putting some sweet treats under the dome.  This set is called Sweets & Treats and cooirdinates with the Classic Cloche set.  For my card, I made a figgy pudding (or a fruitcake) to display under the dome for a fancy Christmas treat.  We colored in the images using blends and cut them out.  The pudding is raised to make it stand out.  I love the classic look of this card.  I got the idea from Stacey Marsh.

Back in the summer during Sale-a-Bration time, I bought the deer punch to go with the matching designer papers.  I took him out the other day and then remembered that I had also bought the Evergreen Border tree punch.  So I paired them together along with a Wonderful snowflake to make this card.  I found the idea from Lori Pinto 

I just love how this card came out.  I used the Peaceful Prints designer paper for the background, the trees and for the deer on this card.  I put some Wink of Stella on the trees and on the stamped snowflakes.  While I didn't get the matching stamp set, I am happy to have this deer punch.  :)

Here is the little girl from the Seasons of Fun set again!  I added her little dog to the scene and love how this card turned out.  I used the saying, Friends like you make this season special to the inside from the Christmas to Remember set.  The stars are glitter paper that I punched out using an older star punch.  The idea came from Joyce Webb.


Last, but definitely not least, is this angel card made using an older stamp set called Wonder of Christmas.  One of my stampers wanted to make a card that was more centered on Christmas story.  I realized that I didn't have a lot of nativity stamps, so I took out the angel.  She is colored with Blends and has a pink glitter star that I cut out using some star cut outs that I had.  The idea from Katrina Duffell.  

With her iridescent snowflake and some Wink of Stella to give her a glow, our little angel girl is sparkling with joy for Christmas.  

While my stamp classes are over for this year, I'm sure that I will continue to do make some fun projects and cards in my stamping room.  


Painted Christmas Suite

The first set that really caught my eye in the holiday catalog was the Painted Christmas suite.  It has so many possibilities!  Here is my first card for this class.

I got the idea for this card from Debra Barlow.  It has a white embossed background (hard to see in the photo) and a cut out from the light green paper in the set of products.  Then I stamped and cut out some of the images and added them to the front of my card.  It has such a soft, sweet look to it.  

In this photo, you can see the little green paper in the background a little bit better.  The embossing folder is the new Timeworn type, which is so nice.


This next card is a fancy fold that I learned to make from Wendy Cranford.  It's a step card and you can tuck images in front of or behind the layers for a great card.  

I cut and scored the cards for my class and we added the Painted Christmas papers to it, the images from Christmas season and the saying from Christmas to Remember.  

I love the font and the sayings from this word set.  I can see using this for so many Christmases to come.


Don't they look beautiful together?

The next card is also a fancy fold.  I got the idea for this from Rachel Tessman.   It uses the same designer papers and images and yet is so different.  The candy favor idea is from Wendy Smith.  I met her at her Stampin Up booth at the Big E in Massachusetts this fall.

I love how these cards all came together.  What a great suite to work with!  


Working on Christmas Cards

I have to admit, I love this card made using the Poinsettia dies and the Cinnamon Cider cardstock.  I think this is my new favorite color to work with!  I found the idea for this card from Michelle on Hello Day Cards.  I had some copper ribbon in my bin and thought that looked so nice with this color.  I embossed the saying with copper powders and love how it turned out.  The flower petals have some Wink of Stella on them to make them shine!
 

The next card is made using the Painted Christmas Suite.  There is so much that you can do with this set and the papers.  I love the pine cone look to this card.  I added a little bird from the Curvy Bird set as an accent and love how he blends in so well with this card.

For the tree card, I used the paper from the Painted Christmas to give yet another look.  The trees are cute outs from In the Pines from last year.  The darker tree is on the front panel and the lighter colored tree is on the inside.  Put together, they add some dimension to the card.  It's a simple fancy fold card.
The birds are from the Curvy birds also.

While these are Christmas cards, they have a warm, woodsy look to them.  I used the new Evening Evergreen on the cards and I like how it looks.  


Last up from this card class is the little girl from the Seasons of Fun stamp set.  She is picking out her tree for Christmas.  Because I used greens in making this card, it looks like she had to go for a walk in the forest to get her tree.  

So cute, right?  I found ideas for my cards from Michelle Quinno, Dianna Gibbs and from Wendy Smith.


Do you like the "woodsy" look to these cards?


It's Time for Pumpkins

I love to make fall cards even more than cards for Christmas.  Maybe it's because I have more time in the fall than I do when December comes along.  I found a beautiful card on Pinterest from Sally Poole that I copied for my card.  

For this card, I colored onto a vellum sheet using the alcohol Blend markers.  Then I spritzed on some rubbing alcohol to smear the colors.  That's how the background was made.  I added some gold flecks from the gilded leaf embellishments to lines of glue to bring more gold to the card.  It's hard to see in the photo, but this card has some major gold shine to it!

The pumpkin and the leaves are embossed with gold powders and the larger pumpkin is cut from gold foil.  Honestly, this is one of the prettiest cards that I have ever made.  :)

The background designer papers on this card are from the Harvest Meadow collection.  I love this paper and wish that there was more of this in the paper pack.  I made this card using Pretty Peacock for the base and adding Soft Succulent and Pale Papaya as the accent colors.  I found the idea for this card from Katie Little.  It's such a sweet card to give to a special friend.


This next card idea is also from Katie Little.  I added some leaf cut outs that I had from a couple of years ago and the pumpkins from Pretty Pumpkins.  The leaf accent pieces are cut from gold foil to give the card some more shine.


And lastly, from this class is a sweet little birthday card featuring the boy from Seasons of Fun.  It was a lot of coloring and work to make this card but it came out so cute.  The idea is from Kim Tolbert.  

The boy is stamped on the inside of the card and you can view him from the hole made by the scalloped circle.  The paper is from Beauty of Friendship designer collection.  

I like the images of the kids from this set and would like to see more of them by this artist in future catalogs.  It reminds me of some cute stamp sets from way back when with kids in them.  


Here is what the card looks like when the front panel is closed.  I used Wink of Stella on some of the images to make them stand out.  

What do you think of this card?

My stamper friends all loved the first card with the alcohol resist technique.  But let's not forget about the cute little kid and his kitty enjoying the fall leaves.


What is a Cloche?


 A cloche is a little dome that you put over something.  In the fall SU catalog, there are 2 new cloche sets to chose from.  They both use the same dome and cut out.  This set, called Classic Cloche, has a house stamp and some cute birds.  Even though the birds on my cards are not inside of the dome, I still like this look.  I copied the idea for these cards from Kerry Timms.  

Look how sweet the birds are sitting on a little branch!  I used the new sponge brush on the dome to shade it in and the flowers are from the Hand Penned stamp set.  


 This is pretty much the same card, only with a Soft Succulent background.  I love how these cards came out.  

Next up is this cards using the "book fold" at the side.  Here I featured the houses from the stamp set.  Then I tucked a little bird in the corner.  The roofs of the houses have Wink of Stella on them to give them a bit of a sparkle.  I cut out some little trees from the die cuts to finish the scene.  

Here is a sample of how to use the Cloche set for a Christmas card.  I put the little houses under the dome and added some snowflakes and sequins for a winter shaker card.  The paper is Beautifully Penned from the summer Sale-a-Bration selections.  I got this idea from Cheri's Cards.

Which one do you like the best?  It's nice to be able to use your stamp sets through many seasons, don't you think?


Making a Fall Apron

A few years ago I made some fall table runners for decorating the house around Thanksgiving time.  This year I wanted to make some aprons to hang in the kitchen so that I went to cook my turkey or make the pumpkin pies, I would have an apron to match.  

So I went to look in my fall fabric "stash" and found some of the fabrics that were in the table runner.  

Here is what I came up with.  I didn't use a pattern, just cut the fabric into a large rectangle, added some pockets and made a curved out corner for the top edges.  I love how it came out.  Now I want to make more.  I mean, what if someone comes over to cook with me?  

What about you?  Do you have specific aprons for your holiday meals?


Monday, November 1, 2021

Fabric Candy Corn

A few weeks ago my friends and I went to the Vintage Market Fair in VT.  There were so many petty things on display.  It's like eye candy for crafters!

One of the things that caught my eye was some cute candy corns made from fabric.  I've seen them before and have wanted to make them in the past.


So I came home and made some for myself.  I think they match perfectly with my fall decor.  :)


I started out making the yellow, orange and cream colored ones and then I wanted to try some new fabrics and see how they would look.  I like the more subtle ones, too, without the orange in them.

I sewed 2 inch strips for the middle and 2 1/4 inch strips for the outer layers to leave some room to draw and turn the shape.

They're stitched at the bottom and have some button embellishments on them.  

Honestly, they are kind of addicting to make.  I'd like to try out some more color combos next.  Maybe use some browns to add variety?


I love how they look sitting on my fall table.  What do you think of them?  Do you like the orange ones or the cream colored ones better?

I'm not really a fan of real candy corns, but I do like these. 

I can't wait to show them to my friends!


Here we are sitting "by the fireplace" at the Vintage Market.  What a great fall day we had!  

Did you go to the VMF?  What sort of things caught your eye?