Saturday, October 26, 2024

Merriest Trees

This week I started making my Christmas cards for my Stamp Classes.  I took out the Merriest Trees set that I had bought last year and had a lot of fun making my cards with it. 

For this first card, I used Pretty Peacock for the card base and added the pretty green tree paper from the Winter Meadow paper pack.  It's my favorite paper from the set and I hated to use it up, but I love how it looks behind the trees on my card!

The white tree is embossed and even though you can't see it in the photo, it stands out from the other two trees.  I added some presents and embellishments to give the card a little more color.  I got the idea from someone on Pinterest but can't find her sample.  (If this is your card, please let me know so I can give you the credit.)

I got the idea for this card from Melissa Faust and What I love is how the garland is added to the tree in the background!  I used Tear n Tape on the back of the paper before I put it into the Cutting machine and then just peeled off the Tear n Tape so that it would stick to my card.  

I love the star cut-outs on this card and the embossed background.  I added some presents and embellishments to give this card more color, also.  I love how it turned out.  

For the third card, I decided that we needed to stamp the tree.  I love how it turned out for this card.  I saw the idea for this from Lori Pinto and love the layout of the card.  I used designer papers left over from last year's Christmas papers.  

This is what the card looks like as you begin to open it.  Usually I put the focal point on top, but I like it folded inside with the saying on the top.  Something different.

Here is the inside of the card so you can see how it all comes together.  

I loved making these cards this week.  I love how they go together.  These are my favorite colors and I tend to use them a lot.  

I would definitely use Merriest Trees again.  But I will try using some new colors.  LOL


Saturday, September 14, 2024

The Grassy Grove

This week I took out the set, Grassy Grove and made some fun cards with it.  For my first card, I used the cut out as the front of the card.  The designer papers are placed on the inside and the deer are peeking through.  I got the idea for this card from Sherry Roth.  She has a video on how to do the inside of the card.  You can watch it here if you'd like to learn more.  

All of the ladies (including me) loved making this card.  I used Winter Meadows papers for my cards this week.  

I got the idea for this next card from Brian King.  I cut out part of the die cut image using a circle and then added the scalloped background to it.  This really give the dies a lot more versatility!  I stamped a moon and stars to make it look like night time and added a small silver deer.  

This paper with the trees is one of my favorites!  It's great for outside, wintry and scenery cards.  Alhouth this card is pretty simple, I just love the look of it.  

For my third card in this series, we sponged some Pumpkin Pie and So Saffron inks onto a white background paper using a rectangular mask.  Then I added the grass, trees and birds in the sky.  I used sayings from the Hills of Tuscany stamp set because I liked the sweet sayings and font.

After I stamped the saying, I ran the piece through the emboss machine using the Subtle folder.  Then I added it to a blank scalloped rectangle, and added the two deer.  This idea was from Diane Vander Galien.  

After playing around with the Grassy Grove set, I decided that it can be used in so many different ways. You may even see the deer family again in a Christmas card.  :)


Artistic Dies


 Last year Stampin Up had a nice die cut set called Artistic Dies.  Sadly, I never got to use it before it retired and went out of the catalog.  The other day I found it and decided to make a few things with it.  

I cut out the leaf in gold papers and added them to the Expressions in Ink papers that were part of the suite of products.  

I added a ribbon, a saying framed in gold and a couple of butterflies. I thought the cards came out quite pretty.  


The second card uses the Stitched Greenery die for the background and a different cut out from the set for the main focal point.  

I added a ribbon, some gold sprigs and an oval saying with a bow.  I got the idea from Karen Young on Pinterest. 


My third card uses the negative image from the die cut to show off some pretty papers.  I got this idea from Juleen Henderson.  

I loved using the Artistic Die set.  I will definitely put some of these pretty die cut images on more cards.  :)

Woodland Grocery Tote Bag

My quilt guild meets for the months Sept to June.  Six of those months are in-person meetings and I make a homemade project to be raffled off for each of those months.  This year for September I made another Grocery/Tote bag using a woodland print that I got at Joann's.  I love the forest animals and the soft colors in the print.  

I used indoor-outdoor fabrics and put a piece of fleece between the top fabric and the linings.  This makes the bag a bit stiffer so that it can stand up, but not too think so that you can fold it.

I made the front and lining pieces and quilted them together and then assembled.  I use a zig-zag overcast stitch to cover the edges of the seams and to finish them off inside the bag.

The handles have webbing in them to keep them sturdy through a lot of use.  

The large buttons are from Stampin Up from a few years back.  They make a great embellishment to the front of the bag.  

When I was making this bag, I cut out for two bags, but haven't finished the second one yet.  I want to make another one for myself.  :)


Irish Chain Quilt #2


This week I had a chance to put the binding onto the Irish Chain quilt that I am making for my daughter.  Last year I gave her a table runner that was made in the same colors. So the quilt will coordinate with it.  I hope that she likes it!

The color of the fabric is a bit greener than what the photo shows.  It's more of a celery green than a beige green.  I started this quilt last year and am proud to get it done in a somewhat quick period of time!  

For the back of the quilt, I found a pretty paisley print that had different greens in it and I thought that it gives some interest to the quilt.  Of course, you could display it either way.  

The quilting has free motion daisy flowers in it.  I love how it turned out.  I hope my daughter likes it as much as I do.  :)


Friday, August 30, 2024

Clearing Off the Longarm

Don't you just love Pinterest?  I pretty much go on there every day.  The "problem" with that is, I find too many craft projects that I want to make!  Can you relate?

This July, when the weather was too hot to go outside, I decided to (somewhat) clean up my sewing room.  I decided that if I wanted to start any new quilting or sewing projects that I had to finish up at least some of the things "in the pile."  You know that pile, the one with the half-finished quilts and other items in it?  

So I pulled out this pink and brown quilt that I had thrown into the pile in 2008.  Yup, for real.  The quilt top been sitting in the sewing room for 16 years!  I had worked on this quilt for 2-3 years and when the top was done, I didn't really even like it anymore.  

But I quilted a simple stipple stitch on it, mostly to just get it done.  And actually, I kind of like it now that it's quilted.  :)

Once I got that done, I was on a roll!  

I finished this red striped quilt, too!  For this quilt, I wanted to quilt roses on it, to go with the pretty red flowers in the fabric.  I found a rose free motion pattern in one of Pat Sloan's books, so I practiced doodling it on paper for a week or so.  Then I free-style quilted the roses in my quilt.  I just love how it turned out.  I am going to keep this quilt.  One of my goals is to have a quilt in every color.  :)

As soon as that quilt came off of the longarm, I picked up another one.  This sage green quilt is an Irish chain that I am making for my daughter, for her birthday.  It was actually supposed to be for Christmas last year, but let's not mention that.  LOL

I quilted some chunky daisies on this quilt.  It looks really cute and adds so much interest to a somewhat plain pattern.  I can't wait to finish it and give it to her.  :)


And look at this - another quilt getting done!  This quilt is a Chandelier quilt made with greens and flowered fabric for one of my friends.  She loves gardening and I'm hoping to have it all complete to give to her on her birthday in a few months.  

For this quilt, I free-styled big flowers, similar to the daisies, only bigger.  It has a slight whimsical look to it, and the flowered quilting really adds to the interest of the quilt.

So... where are these 4 quilts now?  Well, they're in another "pile," ready to be trimmed and bound.  But I promise myself that I will finish them up soon!  I have some new quilt ideas that I'd like to start.  :)


Nurses Zippered Bag

Last week my sister came to visit and wanted to learn how to make a zippered bag.  So we went into the sewing room to pick out some fabric and zippers and I showed her how to quilt and sew one.

To demonstrate making the bag, I picked out this sweet nurses-themed fabric and worked on this bag for my daughter, who is a travel nurse.  I quilted half-inch straight lines on the front and back and then added the zipper.  I found some blue starred fabric to coordinate and added a tassel to the zipper pull.  

To embellish, I added a small crocheted flower and a button to match.  


What fun fabric do you have that you'd like to make a zippered bag out of?  


Monday, July 29, 2024

Zoo Crew Magnets


 Last weekend while I was camping with some of my girlfriends, I brought along some Zoo Crew designer paper to cut out the images.  The paper is filled with cute images of animals, doing fun things in life.  The paper is from last year and I wanted to finally do something with it.

Here I am cutting away!

When I got home, I found 100 magnet backs in my stamping room so I decided to make some little magnets with the Zoo Crew images.  

Honestly, they were so much fun to make.  I just couldn't stop.  

I used colorful papers for the backgrounds and some simple sayings to go along with the animals.  Each magnet has a button and a little tiny flower that I cut out from the papers.

I made about 33 of them, one third of the magnet box.  Every one is a little bit different and the images are embellished with Wink of Stella and some rhinestones to make them sparkle.

I especially like the little hedgehog working on a painting.  I can relate to him - always working on a craft project.  

I love the animal page with the animals that are in the woods.  Here you can see the lion roasting a marshmallow over the fire and the little skunk out on a bird watch.

Then there's the little pig on a hike - seriously, they are just so cute.  

Can you tell that I was having a great time making these?  They're colorful, sweet and just so cute.

Which one do you like the best?  I like them all, but my favs are the bear, the pig and the hedgehog.  

What have you make using the Zoo Crew?  


Monday, July 22, 2024

Bird Decor Pillows

While I was cleaning up my sewing room, I found some cute panels to play around with.  I thought these little birds were so cute!  I stitched them up into little decor pillows and love how they came out.  

The colors are so beautiful and they would look great on a shelf or in a basket or bowl with some other bird items.  They are small panels, about 5" square from the Morris Creative Group for QT Fabrics.  

I love crafts with little birds on them and I plan to put some of these panels into a baby quilt that I will be making soon.  I won't be using all of the panels, so there will still be more to work with.  

Don't they look so cute in the basket filled with lace?  


Thursday, July 18, 2024

Hills of Tuscany

Even though this stamp set, Hills of Tuscany, retired this year, I wanted to get a chance to use it.  So this week I made three cards that definitely have the "Tuscany" look to them.

I got my ideas from Mikeala Titheredge on Pinterest.  They are beautiful cards and I was so happy to make them, putting my own spin on them, of course.  

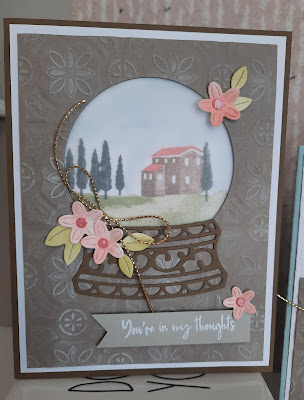
This is one of the prettiest cards I have ever made; I just love the serene look to this!  It's like looking into a snow globe.  :)  I stamped the image onto a white scrap and tucked that behind the circle hole that I cut out of the background.  A piece of vellum is next, to give the card the look as if it was glass.  I used the Tin Tile embossing folder and gently colored the raised areas with some white craft ink using a sponge dobber.

The base of the globe is from the Snow Globe Scene dies.  The flower cut outs are from the Country Flower dies.  I painted some watercolor paper with a paint brush using the ink from the stamp pads and then cut them out, to give them a soft watercolor look.

The second card is pretty similar to the first, only this time I added the circle to the front of the card.  I eliminated the vellum for this one.  It's still so beautiful.


Here is a look at the two of them side by side.  

The third card is more like a post card.  I loved playing around with this set.  It reminds me of when I visited Italy.  I could easily make more things with it.

While looking through some photos this week, I found this pic of when I went to Italy.  The background almost looks like the stamp set images!  Maybe that's why I liked the set so much.  :)


Friday, July 5, 2024

The Kitties are Everywhere

Here are a few more of the zippered kitty bags that I made.  This kitty has such a mysterious look on her face.  I love her surrounded by the blue fabric.  It matches the design so well.

This is a variation of the black kitty panel.  Did you notice the cute little bird on his head?  So sweet :)  .  

After seeing how the scraps in the coral basket brightened up the last bag, I took out some yellow fabric.  I love the addition of more colors for the bags.

The possibilities are endless for these little kitties.  I'm so glad that I worked with the kitties this week.  It's been fun to spend more time on my crafts.

Today was a nice summer day, so I brought the kitties outside for their photos.  They do look sweet, don't they?  Which one is your favorite?


Even though there's more panels, it's time to move on to another project today.  Maybe some tea cups? We'll see.