
I have wanted to include some tutorials on my blog to show you how to make some simple sewing projects. Today I made this little catch-all out of fabric and thought that you might like to make one yourself! It's pretty simple if you have some basic (machine) sewing knowledge.

Here’s a list of supplies that you will need to make this
project:
(2) pieces of 11" square coordinating fabric
(1) piece of 11" square batting- use batting that is somewhat stiff so your catch-all will keep its shape
4 buttons
Matching thread
Scissors
Seam ripper (for your mistakes!)
Ruler
Turning stick (a crochet or knitting needle works fine)
Darning or embroidery attachment for your sewing machine (optional)
Sewing gloves for machine quilting (optional)
Pins and sewing needle
Sewing machine
Rotary mat with cutter and ruler
Pen
Making the Fabric Square:
Making the Fabric Square:
Cut your fabric pieces into 11” squares if you
haven’t already done so. Layer them with
the batting on the bottom, then the
two coordinating fabrics with the right
sides together on top of the batting, like this:

Note:
If your batting is not at the bottom, once you sew the project pieces, your
batting will be on the outside of the project, not the inside! Also, be sure that the right sides of your
two fabric pieces are touching each other before you start to sew. The wrong side of your fabric should be what
is showing on the top when you start to sew.
Next, machine sew the 3 pieces together around the edges with a 3/8” seam. Leave about 3” open on one side to turn the project. Here is what it should look like after you sew:


Now trim the corners and around the edges of your project, being careful not to cut through the stitches. On the side that has the opening, don’t trim! You will need that 3/8” to fold over the fabrics once you have turned it right side out.
Next, grab one of the corners through the opening hole and turn your project right side out.


Use your turning stick to “square up” your project, being careful not to poke the corners so hard that it makes a hole!
Carefully turn under the raw edges where the hole was and iron your project flat. With a needle, hand sew the hole using a blind hem stitch.


Now, using
your sewing machine, topstitch ¼ of an inch around the outer edge of your
project.

Your piece should look like this:

You are ready to decide if you want to do some machine quilting on your project or not. If you are in a hurry or you just want to spend any time on the quilting, that's okay! Skip over the next section and continue on with the side pleats.
Quilting Your Square:
You may choose one of several ways to do this. You can machine quilt with a free-motion stitch (also known as stipple). This is what I have done here:

To do this you will have to use the embroidery or darning foot on your sewing machine. You will also have to drop the feed dogs or cover them with a plate so that the fabric doesn't feed on its own. (Each machine is a little different, so you might have to read how to do this in your manual.)

Start sewing near the edge and step on the pedal. You have to move the fabric piece to get the machine to sew. It's like drawing squiggles on a piece of paper! Keep an even pace with the foot and you will find it pretty easy to do. Use the same color thread to match your project so that it blends in well. I like to use sewing gloves for this part because the rubber bumps on them keep the piece from slipping. (I call them my magic sewing gloves!)

Another way to quilt your piece is to sew straight stitches about an inch apart like a grid. If you are doing this, you can start on the straight edge by measuring with a ruler and using quilting tape, or can start on the diagonal and line up your quilting tape in this direction. Once you have machine stitched lines in one direction about an inch apart, turn your piece and stitch your lines in the opposite direction to form a grid. Your piece should look something like one of these examples:

Here is my piece after machine stitching:

Now you are ready to sew up the sides and finish your project!
Finishing the Project:
Fold your square in half, with your main fabric (the fabric that you want to be on the outside) to the inside. Place a pin in it to keep it from slipping. Take out your ruler and mark in 3/4 of an inch on the folded half, like this:


Now do the same for the opposite side. These are lines to make the pleat along the sides of your catch-all. Sew them on the machine, using a backstitch at the beginning and end of your pleat.

This is what it should look like:

Open your piece and fold and mark the remaining two sides in the same manner.

Finish stitching the last two sides along the lines to form the rest of the pleats (four sides in all).

Now your catch-all should look something like this:

I usually turn it right side out at this point just to check and make sure that all of the pleats look correct. You wouldn't want to trim them off if you have sewed something wrong! Once you have checked it, turn it back to the wrong-side out showing.
Using your scissors, trim off the pleats to about 1/4 inch.
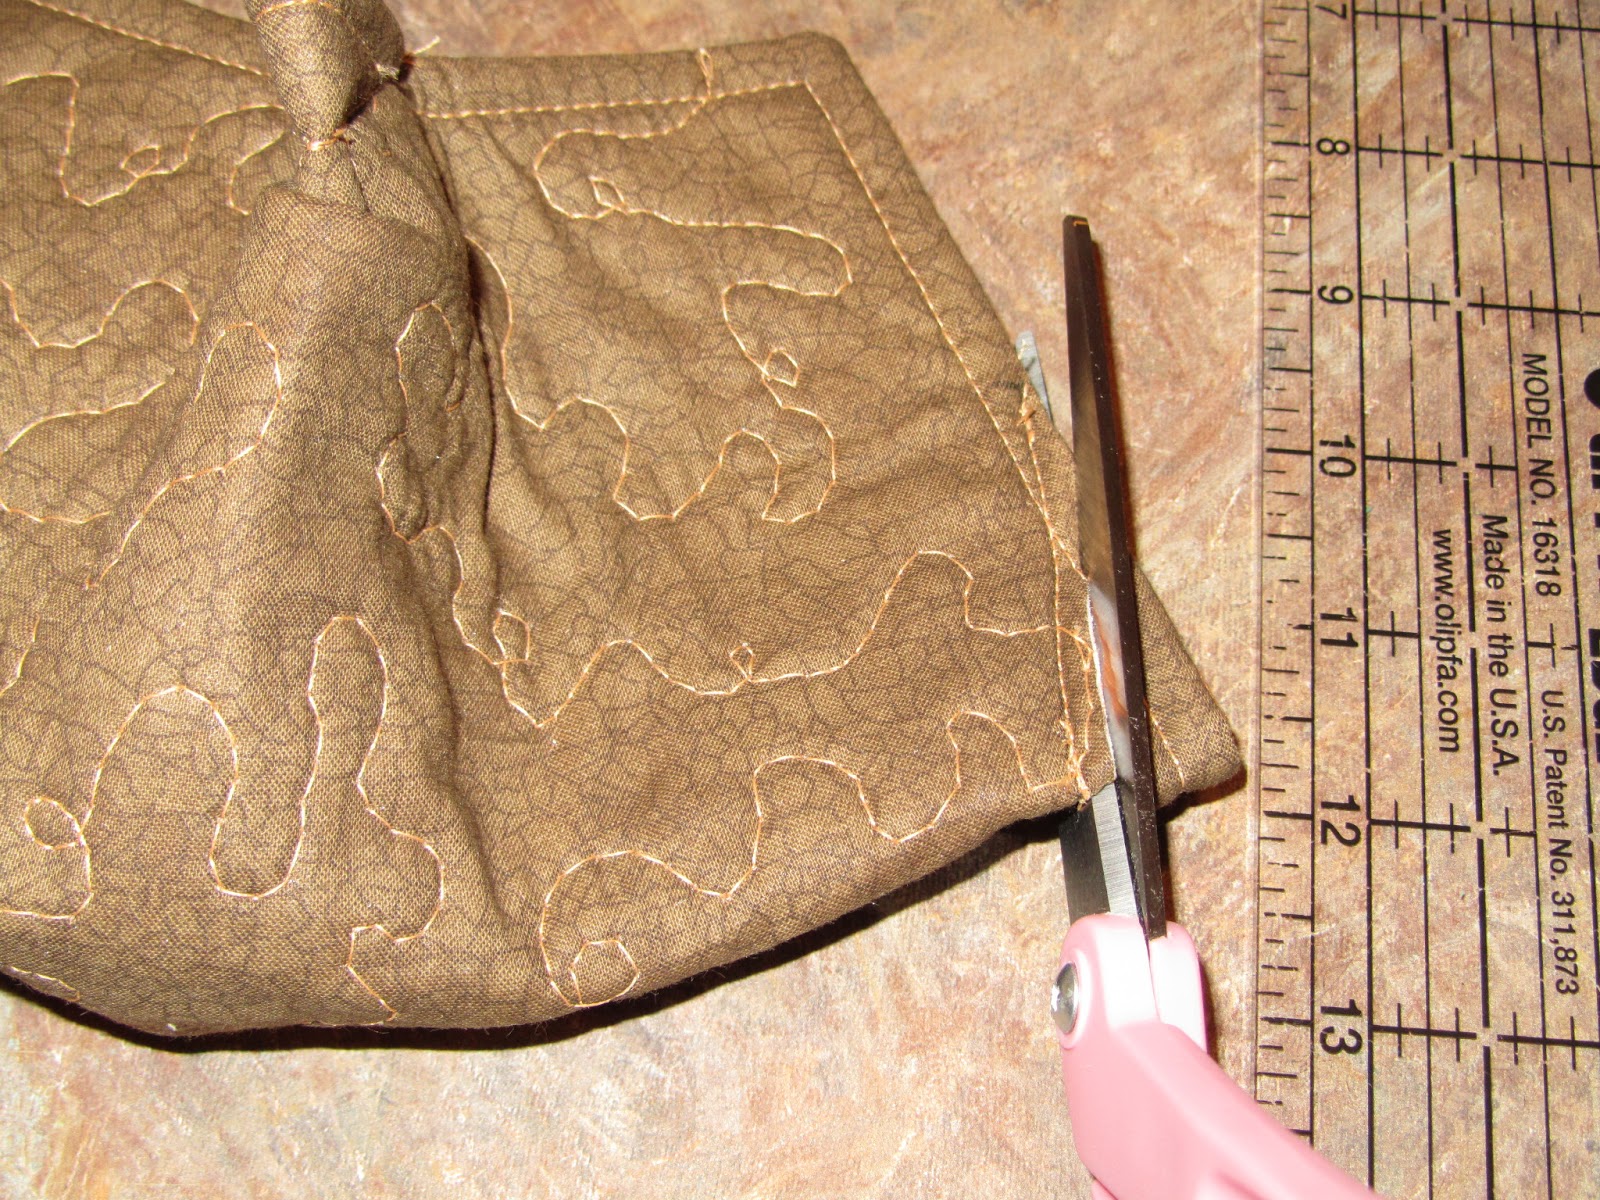
Then zig zag over them using your machine to finish off the raw edges. (Note: you don't have to trim and finish off the pleats on the inside. If you'd like, you can just leave them showing on the inside. Personally, I like to trim them and make it look nice and neat on the inside of the project.)

Turn your project right side out! You're almost finished!

Then fold down the corners and secure with a pin.

Sew a coordinating button on each flap through all thicknesses. Congratulations, you are finished!

Let me know how your catch-all turns out! What are you going to use it for?
No comments:
Post a Comment