Saturday, February 4, 2023

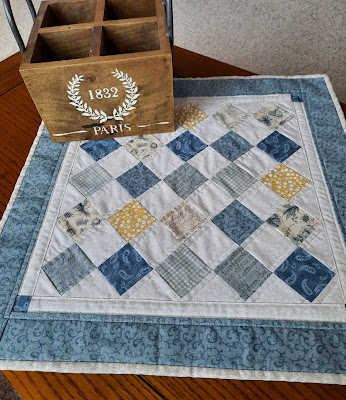
Blue Table Topper

After I put away the Christmas items this year, the house looked sort of bare.  So I thought that it was time to make some new table toppers and table runners to freshen my decor.

I found a fabric line that I have been saving and took it out today.  I cut 2 1/2 inch squares and set them on the diagonal.  

I like the twist of this table topper.  It's on the coffee table in the family room and I think it's just right. 

Why is the yellow in it?  The yellow fabric was somehow put in the bin with the blues.  So I thought that a splash of color would look just right.  I'm pleased with how it came out.

Now I just need to make a couple more for the end tables!  


Do you use small quilts to decorate with?  

 I love the cozy feel that they give to my home.  :)


Alphabet Letter Set

Before Christmas I was thinking about making an alphabet set of letters made from fabric for my granddaughter.  She's getting close to 2 years old and I thought that it would be a fun way for her to learn her letters and begin to spell simple words, when she is ready.  

I looked at what people were doing on Pinterest and Etsy and came up with a plan.  I found a font on my computer with basic letter shapes and enlarged the letters to 500 points.  Then I made the letters an outline instead of fill so that they didn't use up all of my ink when I printed them.

The letters are about 4 1/2 inches tall.  I cut them out, traced them onto pretty fabrics and sewed on the line.  I used disappearing ink so that after I sewed the outline, the ink would disappear.  

To make the "quilt sandwich," I ironed some stiff interfacing to the fabric.  This step keeps the letters from fraying quickly.  Then I put a layer of felt next and a white fabric for the back.  I sewed each letter along the lines and then cut them out, keeping about 1/8 inch along the edge.  The white back is so that she will know if the letter is backwards.  

For some of the letters, I made 2 or 3 of them, especially the vowels and other letters depending on what she would need to spell her name and some simple words.  I made sure that there were 2 "N's" and "A's" so that she could spell Nana!  

Today I made a small basket for her to keep the letters in so they wouldn't get lost.  

I quilted the bag and added some handles so she can carry her letters around with her.  

The fabric that I used is called Just Another Walk in the Woods.  I had a couple of layer cakes (10" cuts of the fabric line) and picked out cute, bright fabrics for the letters.

This week I'll stop by Michaels and pick up a board and wrap flannel around it so that the letters will stick to the flannel like the old flannel boards that we used to have in Sunday School years ago.

I can't wait to give her this gift and start teaching her the ABC's.  Would I make another one of these?  Originally I thought that I would make two sets for her, one for here and one for her home.  Now I'm not sure.  It took a lot longer than I thought to make the letters.  I could have easily made a baby quilt in the same amount of time!  Lol.  


Zippered Pouch with Nest Fabric

The other day I had out my bin of Nest fabrics by Lella Boutique.  I have always loved this fabric line, so I decided to make a zippered pouch out of it for a friend of mine who comes over to sew.  I decided to install the zipper onto the front piece, which is easier than fussing with it at the top, and quilted a small bag for her sewing supplies.  

I added some fabric yo-yo's along with buttons to it for embellishment.  Then I made a little pincushion with the same fabrics.  I sewed a strip of the selvage to the top because I loved the colored hearts and added some buttons to the pincushion, too.

She loved how it turned out.  Her handbag was gray so it matched her other items.  :)


Country Floral Lane Valentine Cards


 One of the sweet new sets in Stampin Up's mini catalog is called Country Floral Lane.  It features a heart stamp set with a punch and two packages of pretty papers.  I had so much fun coming up with these cards this week.  I just couldn't stop making them!

My first card features designer papers from the Country Gingham set of papers.  I stamped the heart using the Stamparatus so that I could get a good image.  Then I lined up the second stamp which stamps the green leaves and the heart came out so perfect!  I had my stamping ladies use the Stamparatus to get their images stamped and lined up properly.  It was fairly easy.  Then we cut out the heart and used it as a focal point for our card.

I punched the red heart from the designer papers called Country Floral.  The punch that coordinates with this set matches up with the images on the papers.  I added a bow made with Pool Party sheer ribbon.  

As you can see in the photo, there is also a candy/gift card holder.  I put small Hershey's bars in the pocket envelope.  I used an old Sizzix die to make the holder.  Using the pretty papers, it coordinated so well with the card set.  

For the second card, I stamped a couple of sprigs onto the circle focal point from the stamp set, Country Bouquet.  Then I added the punch heart and leaves with dimensionals.  I added a tag with white heat embossing to the card for the saying.  Then I punched a couple more hearts out using the coordinating punch.  This card idea is from Amy Koenders.

This is pretty much the same card, only I used Mint Macaron for the card base and the gingham paper.  I added a cut out heart from the designer paper and added the punched heart and leaves, also.  The saying is from the Full of Love stamp set.  

For my third card, I stamped the sweet owl from the Sale-a-Bration set, Adorable Owls.  I saw the idea to put the mail in his hand on Pinterest.  The mail is cut out from one of the images in the Full of Love stamp set.  I added a couple of punched hearts to the card and the sayings.  I love how it turned out.  :)

This last card opens up at the top to reveal a pocket on the inside of the card to insert a note or a gift card.  Good idea, right?  I saw this idea from Simply Sweet in Ink designs.  The ladies who come to my class loved this card the best.  Maybe because it's a little different.  And who doesn't want a gift card?

I love playing around with this set.  I just need some more time to make more of these pretty cards.  I hope to send some out for Valentine's Day.  


Knitting Case with Lavender Sachet & Accessories


I think winter is a great time for catching up on your sewing projects.  I always have so many things that I want to make.  :)

One of the ladies that I work with loves to knit and I thought that it would be nice to make her a zippered bag for her knitting needles.  I took out some older Tilda fabric called Plum Garden and made the zippered pouch for her.  I added a couple of Tilda fabric buttons and a tassel.  

But I thought that it looked sort of plain, so I made a small zippered bag for her row markers and darning needles.  

After working with the pretty purple fabrics, I wanted to add a lavender sachet to the gift.  So I sewed up little pouches to put the lavender in and then stamped on a muslin bag and added a small yo-yo and button.  

Then I stitched up a little purple bird to match.  The lavender smells so nice and it makes a nice little something to tuck in a drawer or put in the clothes dryer to softly scent your clothes.  

When the lavender loses its smell, you can add a couple drops of essential oils to it to re-scent it.  

I love how all of the gifts came together.  I added a matching card made using an old lavender stamp and some pretty purple papers.  (For some reason the card didn't get photographed.)

My friend loved her gifts and said she couldn't wait to get home and arrange her knitting supplies.  :)

What's next?  Now I want to make more items in the pretty Tilda fabrics.