Thursday, May 29, 2014

Many Fabulous Fobs

When I was at the Quilt Show a few weeks ago, I picked up a pattern to make this fabric basket with handles.  I also bought a package of mini charm squares that measure 2 1/2".  I used the squares to make the basket with!  It didn't take very long and was easy to make.  I'm sure that I will be making more of these.  I didn't quilt the lining on this basket, but I think that when I make the next one that I will.  It needed to be a little thicker.

I recently saw an article in a sewing magazine that had these (Fabulous) Key Fobs in it and wanted to try making them.  I had a hard time finding the hardware so I had to order it online.  Then I had a hard time finding the webbing to fit the hardware!  I ended up ordering that online, too.  Of course the webbing that I ordered didn't match the size of the hardware, so I had to order MORE hardware.  Then I had to order MORE of the webbing to fit the original sized fobs!

Now I have enough hardware to make 150 of these things!  Ha ha!  I couldn't have just ordered 10 or 25 of them.  I mean, really- what crafter orders only 10 of something?  I think that my family and friends are going to be getting assorted Key Fobs for presents-  for EVERY occasion! 

I really love the fabrics that I made these from.  If you promise not to tell, these are the colorful fabrics that are in a quilt that I am working on for my niece- for her graduation!  I ended up with way more fabric than I needed to finish up her quilt (do you notice a trend here?), so I need to do something with it.  (You might be seeing more of it!)
I tried making the Fobs in two sizes.  The smaller ones are just in case you don't want a large key holder in your purse.  One for each key?  What do you think?


Saturday, May 24, 2014

Patriotic Flag Pins

Feeling patriotic today, I found some fabric in my stash with flags on it and made these little quilted flag pins!  Although they weren't hard to make, they did take a long time.  Each one is hand quilted and then a pin-clasp sewn on the back side.

I made one of these little flags as a gift for one of my friends.  I went down to my "stamping room" (also known as the messy basement) and made the little box out of a Sizzix die to put the flag pin in.  I "wrapped" the box in a clear little bag and tied it with a red bow. 
Yes, she was impressed.

Now I have a new flag pin to wear on the patriotic holidays!  What crafts are you making for the Memorial Day weekend?

Saturday, May 17, 2014

Owl Always Love You Quilt

I started this quilt a few years ago for my youngest niece, Cassie, and finally finished it this year in time for her birthday!  I wanted to make her a quilt that wasn't pink or purple so I chose this cute owl fabric and these trendy colors.

You can see the cute owl print better in the fabric in this photo.  I also got a fabric with a panel of larger owls. I wasn't totally sure what to do with them, but I tucked one in each of the corners of her quilt. 

Because it took me so long to finish, I was a little worried that my niece was rapidly outgrowing the cute little owls in this quilt.  But thankfully, she loved it, especially the colors! 

Petite Petals Class

This month I held a stamping class where we made these three cards all using the same stamp set, Petite Petals.  The nice thing about this stamp is that it comes with a punch and that makes it is so quick and easy to use!

I think this card was my favorite of the three.  I just love the blues and how they gradually change color in the "bouquet."  I don't usually use blues in my projects, but I really like how this came out.  I got this idea from Jackie Bolhuis.

Because they are so pretty, I made a lot of these cards to give away along with the cutest little Post-It holder ever!  The little favors have a small Post-It pad in them and are made using the Envelope Punch Board.  Then they are wrapped with the ruffled ribbon that has elastic in it.  Because it stretches, you can just slide down the ribbon to use the pad instead of taking it off!  If you want to make these, you can find the directions from Deb Valder's site on how to make them here.

I really love the two colors on this card and how they go together- Baked Brown Sugar and Crisp Cantaloupe. I don't know what I will do next year when they retire.  Maybe cry (no, not really!).   I got the idea from a card on the blog called Whimsy Art Cards.
I gave my customers two variations for this card. It could either be made with a green scallop on the edge for a dressy look or with more of a "grunge" look that has tears and sponging like the one on the right.  Which look do you like better?
Unfortunately I lost the link from where I found the idea to make this card.  I will definitely post it if I find it!

Which one of the cards is your favorite? 


Tuesday, May 13, 2014

Time for Tea!


I love to plan and have parties!  I love the planning, preparation and hosting.  Last month I held a Tea Party at my home that included tea and food, door prizes, games and then some stamping projects with a "tea" theme!
 
Part of the fun was collecting vintage tea cups, plates, teapots, cloth napkins and some doilies to decorate with.  I found this little vintage bird cage at a local consignment shop.  I just love how it worked so well with my theme!
I picked up this chalk board at a garage sale for $3 and hung it on the wall in my kitchen.

For the party favors, I sewed some little "tea bag" sachets and filled them with lavender.  I tied the tea bags together with a bow and added some matching tea cups for the tags.  I found the idea for them on Pinterest by Laurraine Yuyama.  I had a lot of fun making these, but they took way longer than I expected to make!  (I made 30 sets!)
 I asked the ladies to "dress for tea" and to wear hats if they had them.  There were prizes for the best dressed. 


 Of course I made cucumber sandwiches.  What would a tea party be without them? 


 There was also egg salad and tuna sandwiches, fruit, some pumpkin cupcakes with cream cheese frosting and an assortment of delicious desserts and scones!


I even made the name tags shaped to look like a tea cup!
After we had tea and plenty of food, we played some games and then made some stamping projects- my favorite part!  

I ended up having the tea party on two different days so that I could accommodate everyone's schedules and have room in my home!  Both days were so much fun.


I'm already looking forward to planning another party- what theme should I have this time?

Using the New Stamp Set

Although I love using all of my stamp sets (and I do have a lot of them!), it's always fun to get a new one.  This stamp set, Work of Art was given to all of the demonstrators who attended the Catalog Preview night.  Strangely enough it was held at the Crossgates Mall in the movie theater!  Go figure that one.

I wanted to use a purple palette for this card and just kept adding embellishments until I was satisfied with.  It's got washi tape, ribbon, punched leaves and flowers, some painting, a jeweled brad and some rhinestones.  Oh yeah, I also sewed the edges!  Maybe that's why I like it so much.  :)


Thursday, May 8, 2014

Trip to the Quilt Show

A few weeks ago I went to a local Quilt Show and met up with some of my friends from my Second Saturday Quilting Group to ooh and ahh over some beautiful works of art!

Here are some of my friends ready and waiting to go! 

I certainly can't show you all of the amazing quilts here on my blog; there were so many of them!  But I wanted to share some snippets of some of the amazing works that I found.

This block is from the winning quilt at the show.  It had 9 different applique blocks, all with a Christmas theme.  I love the colors of the angels in this block.  And look at that quilting.  Wow!

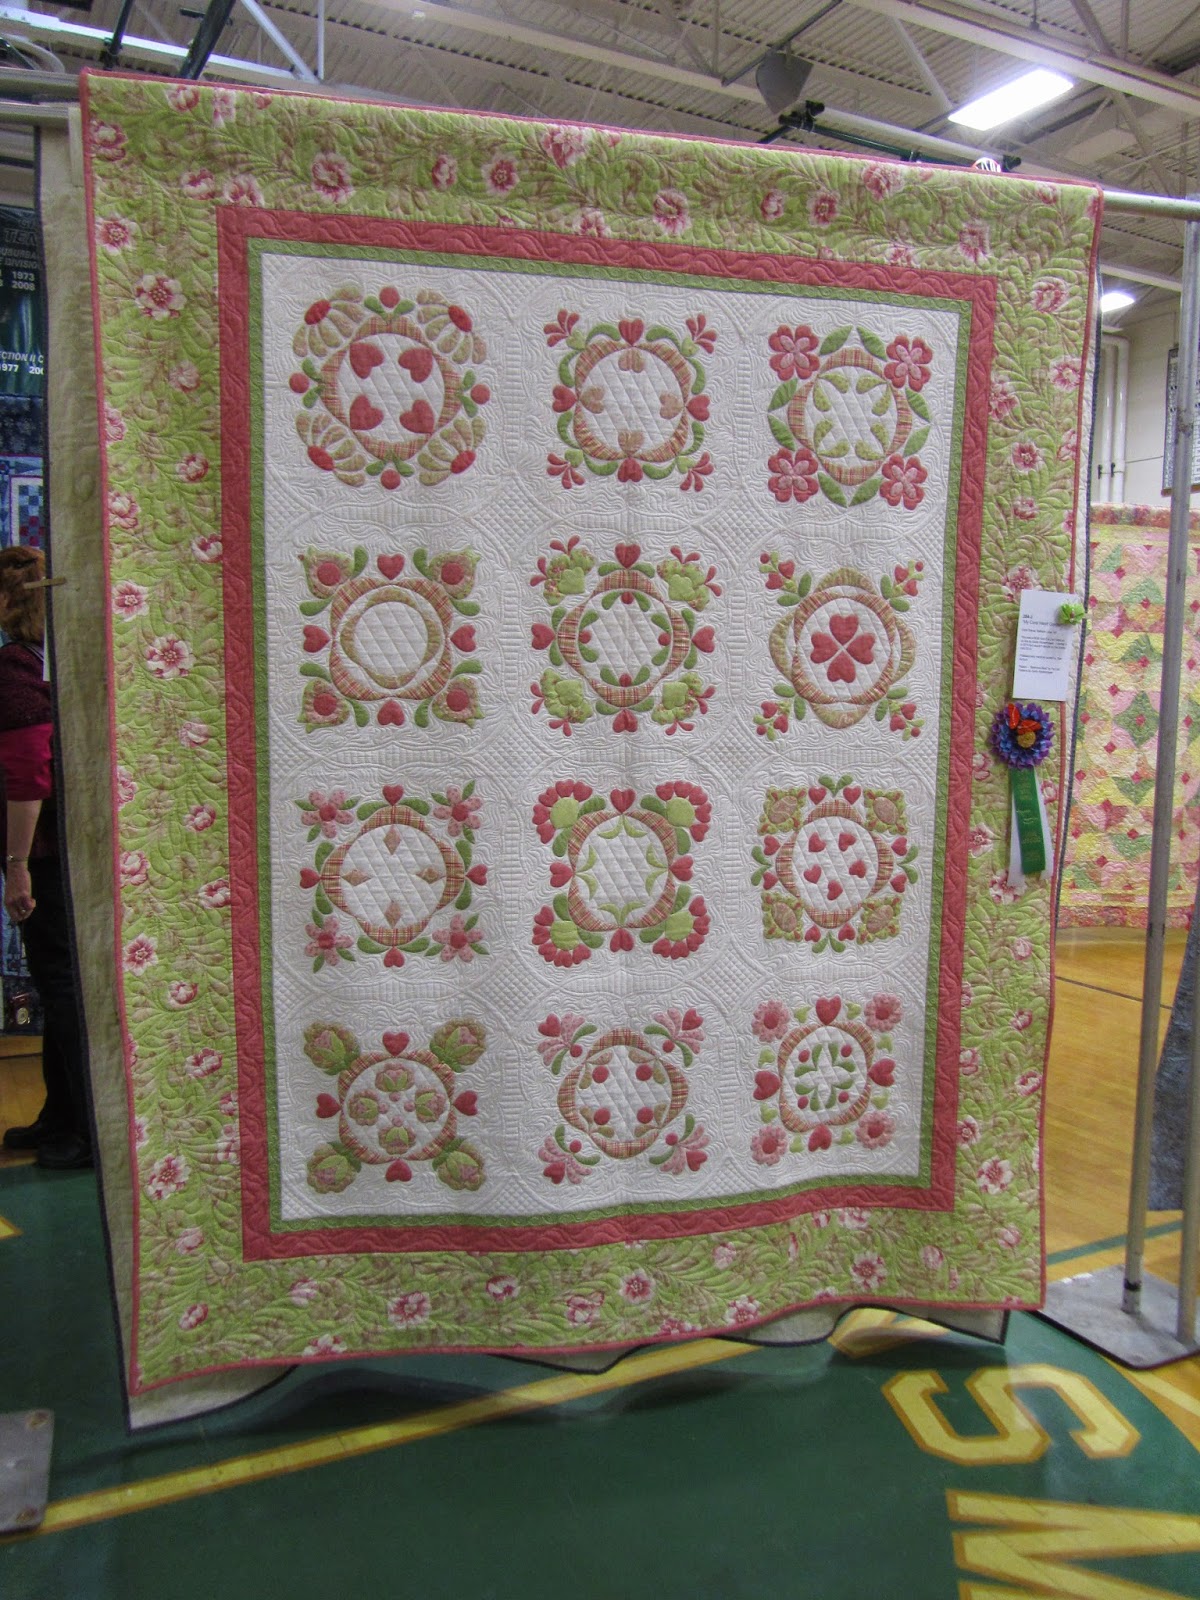
This quilt stood out to me because of the colors.  I've always been drawn to pinks and greens!  They are so peaceful and shabby chic looking to me.

Look at this cute little owl wall quilt.  I love the simple black and white picture quilting.  Someday I want to try to make something like this.

This is a wall hanging that I just love everything about- the colors, the background, the tree, the dragonfly.  I could go on and on.  And come to find out, it is a Round Robin.  One woman makes the center square and then passes it on to the next person who adds another layer.  I think this is my favorite piece from the show.  It's just so unique.  I think it would look good hanging up in my home!

I'm not too much into quilts with curved pieces.  Maybe because they look like so much work!  But this quilt caught my eye.  I love the bright and funky looking colors that the quilter (one of my friends, Sue) chose for the centers of the curves.  And the circle quilting takes it to the next level.

Of all of the beautiful blocks and fancy quilting to look at, sometimes I like to just enjoy the simplicity of a simple block.  Pinwheels are one of my favorites.  I love the colors that this quilter chose.  It reminds me of the sea.

My friend Carol, the applique "queen," had several quilts in the show.  Although I got to see them while they were a work-in-progress, it was breathtaking to view them hanging at the show.  And, yes, she did win a ribbon for this one. 

There were so many quilts to see, but this little guy caught my eye.  He was sort of tucked away hiding in one of the blocks in a scrap quilt.  He's a bit whimsical, just like me.

Would I ever enter one of my quilts in a show?  Yup, you guessed it- it's on my bucket list.  ;)


At the End of the Day

I have always wanted a nice, cozy "spa" bag to sit on my shoulders at the end of the day.  These flannel bags are filled with rice and when you warm them up in the microwave for one minute, they give out moist heat that really soothes your sore and aching muscles!

They are also great to use just to warm up when you get a chill.  And here in upstate NY, that is half of the year!

I designed the layout, making four pockets panels in the flannel to keep the rice in place.  They are just the right size to lay across your shoulders.  Then I added a handle so that you can maneuver it to just the right place across your neck or back.  You can also hang it up on a doorknob or a hook when you are done using it.  I added a bit of lavender to make it smell oh, so nice. 

Honestly, I don't know how I lived it without one.  It just makes the end of the day so relaxing.  Ahh...