Saturday, March 14, 2020

More Poppies - Yes, Please!

The ladies that come to my stamping classes all wanted more poppies!  So I held a Stamp-a-Stack card class where they could make 8 cards using the Peaceful Poppies designer papers.  I saw the idea online by Patty Bennett and decided to make it happen.

I purchased 3 packages of the Peaceful Poppies elements for the class.  This gave each of the ladies some Poppy embellishments to work with for their cards.  Because we were making so many cards, we had to keep the stamping and cutting to a minimum.

I think everyone had a good time and now I have a nice supply of cards to give out! We used the Peaceful Moments stamp set for our sayings.  I really like the font and the saying in this set.  It's been a staple for our 2020 projects so far. 

So simple and so beautiful!  Which color combo is your favorite?

Poppies Parading Everywhere!

When I first got the new mini catalog, I wanted to recreate the front page and put poppies everywhere in my craft area!  Well, I never did that, but I have made a lot of cards with the Peaceful Poppies suite.

I ordered some mini calendars from Amazon and made these cute little desktop calendars.  They are made with a "W" shaped piece in the center so that they stand up and don't collapse.  I used some Poppy designer paper and added one of my favorite stamps - Do something creative every day.  Although it doesn't say, Be creative every day, it's pretty close to my business and website name.  Then I cut our a bird and flower from the Bird Ballet papers to decorate it. I got the idea from Mary Knabe.  I love how it came out.

Our first card uses both the Poppy Moments and the Painted Label dies.  The only stamping is the saying.  I used the Peaceful Moments sympathy saying, but you can put any saying that you want on this card.  This idea is from Bonnie O'Neill.

Look how sweet these two go together.  :)

I just love this next card!  I got the idea from Jaimie Babarczy.  At first I made the card using Rococco Rose, but I like it better made with Real Red. 

It's a more subtle way to showcase the poppies.

When I plan for my classes, I like to make the projects coordinate.  I just love how these all came out.

Lastly in this collection, is this card made using the beautiful Poppy papers.  The paper is so amazing that you don't even have to add much to make it a nice card. 
All that I added to these is some ribbon an a saying. 

The ladies who came to this class all loved the cards, the papers, the poppies, etc.  What is not to love about this?

Pink Bees?

This week I took out the bee set again and made this sweet little framed project for one of my friends that loves bees.  I decided not to use yellows or golds, but added some pink to the project.  While I've never actually seen a pink bee before, I suppose it's called creative license.  :)

I used some little "inchie" stamps and punches to complete this frame.  It's only about 5" tall, so it's not too big.  Nice size for a desk or nightstand.  My friend loved it.  :)

Honey Bee Bundle

When I first saw the new mini catalog from Stampin Up, I was drawn to the Honey Bee stamp set.  This is my version of the card that is featured in the catalog.  I added the "bee lines" give it some interest.  The little bee is so adorable, stamps well and cuts out so beautifully. 

One of the "sweet" things about this stamp bundle is that if you purchase the stamp set and cut outs, you can earn the bee designer paper for free from the Sale-a-bration promotion.  I got the idea for this card from one of my fellow demonstrators. 

Here you can see better how the cards opens up.  I just love how it came out. 

This bee card is another fancy fold.  I got the idea for this at my demonstrator's meeting from Jo.

Here is the inside of the card.  I loved using the bee set with the coordinating papers.  It's hard to tell in the photos, but the bee paper has gold shiny accents that really make your cards and projects come to life.  I can't wait to make more bee projects.  :)


Trip to the Tropics

When I am putting together my card classes, I love to give them a creative title.  Today's cards all feature a tropical theme so it's like taking a Trip to the Tropics.

I love the pineapple cut-out in this suite of products.  And I love the designer papers that coordinate.  I have to say, this year's mini catalog is the best that I have ever seen and I've been working with Stampin Up since 2003.  

I got the idea to cut the pinapple from the designer paper from Su Mohr.  Then I placed it onto the paper that has the orange lilies.  For the first time, all of my crafting ladies voted that this card was their favorite.  I could craft these all day!  

For the next card, I stamped the palm trees and cut them out with the dies.  They cut out so nicely!  I added the saying and pineapple to complete the tropical look.  When I was all done with the card, I thought that it needed a little something else along the bottom, so I added the Aloha cut out that comes with the suite.  The idea for this card came from Heather Heraldt.

I love the simplicity of this card.  What a great template - just put a strip of designer paper (any kind will work) and added a saying and embellishment!  I wish that I had bought more of this tropical paper - it looks so good.  I added a couple of pineapples and a saying using the So Sentimental words and the Stitched So Sweetly die cuts.  

Here is another card with a different saying and instead of using pineapples, I added some of the flower cut outs that come with the pineapple set.

Lastly, I wanted to show that you can use this tropical set in other color palettes.  Look how beautiful these hibiscus flowers look in pink tones.  I copied this card from bluerosepapertreasures.  

Here is another version of this card.

Which tropical card do you like the best?  

Tea & Cake Cards

Here is upstate NY we have had a pretty mild winter so far.  And even though we've had some nice days, I call it the "fake Spring."  During March and sometimes into April we can still get snowstorms.

But that doesn't mean that we can't craft and bring Spring into our homes.  For this week's class, I made some cards in "springy" colors.  I called this class, Tea & Cake.

We started out with this sweet Tea Cup card featuring the Tea Together set and cut outs.  I got the idea from Chris Smith on Pinterest and revamped it by added Coastal Cabana cardstock and the back of the one the snowman papers left over from Christmas.  I love it with the purple accents and the cut out saying. 

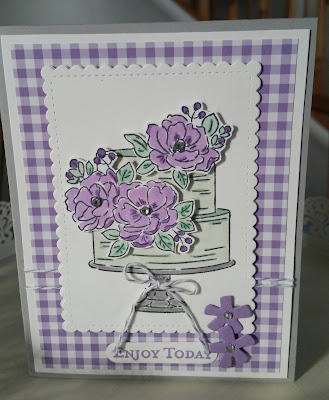
Next up we worked on a Cake card using the Happy Birthday To You stamp set from Sale-a-Bration.  I love it teamed up with the purple gingham, don't you?  We cut out the flowers so the card has some dimension to it.  Sweet!  I got this idea from Teri Pocock.

Don't you just love these colors together?


To go along with the Tea theme, we made this card that also includes the teapot from the set.  I paired it with the Garden Lane designer papers.  It looks so soft with these colors.

And here's the surprise with this card - if you score and fold it just the right way, the teapot and cup stand up for displaying!  I love how this card is interactive.  :)

If you like this special fold, you can find the link here.  The idea for the card came from Diane Barnes. 

And finally, to round out the spring feel, we made a simple card with a butterfly.  I used Sea Foam green cardstock, but you could use any color for this card.  The butterfly was cut from last year's Botanical Butterfly designer paper and the grassy stamp is from Home to Roost. 

Even though you can't see in the photos, I have added Wink of Stella to make the flowers and butterfly shine and stand out.  I already feel more in the mood for spring.  :)


Saturday, March 7, 2020

Blue Batik Quilt #3 Just for Me


I love to start quilts!  Finishing them, well... not so much.  There are a lot of unfinished quilts/projects hanging around in my sewing room. 

But I'm on a roll!  This weekend I finished up this beautiful Blue Batik quilt that I started a couple of years ago.  I had seen this quilt in a Missouri Star video and wanted to make one like it just for me.  Check out the video here if you'd like the pattern.  She calls it Super Simple Squares Quilt.  It's actually the same pattern that I used for the Soft and Pretty quilt in the last post, only in this quilt, you can see the square in the corner around each block.

I chose a soft blue batik collection called Yumi that I found from a quilt shop online.  And get this, I've never used batiks before.  I don't really like them, but I thought that they did really look good in this quilt.  :)

I made this quilt for me to to in my family room.  It has deep blue accents in it and I thought it would look nice as a throw in there.  I even like the back of the quilt which is a lovely blue batik.

Honestly, I'm really proud of myself for finishing this quilt.  I just really love it.  And guess who else really loves it?  Ginger thought it looked great in the family room.  She has christened it and it's already full of kitty cat fur.

Quilt #2: The Soft and Pretty Quilt

So this year I decided that I would like to make each of my friends a quilt!  I know, it's hard to believe, because in the past I have not been known to finish a lot of the quilts that I have started. 

But I thought, if I keep them somewhat simple, perhaps I can get one quilt done every two months.  So my goal is to finish 6 quilts this year and 6 next year for each of my friends. :)

This quilt, called the Soft and Pretty Quilt features some soft and delicate fabrics that I though went together very well.  Most of them have been sitting on the shelf in my sewing room for about 20 years (!) and I figured that it was time to use them.  :)

This quilt is for a friend of mine who has been going through chemo treatments.  Although I should have given it to her last year, I actually finished it and gave it to her in February.  She is a pretty woman with a very gentle spirit about her.  That's why I picked out these colors for her.  She loved it.  :)

It's made from 5" squares with 2" sashing in between the rows.  I used a set-in square for each block to keep it all lined up even though you can't really see the set-in squares.  It came out so pretty.  And to think, I've finished up two quilts already this year.  :)

What do you think?  Is it better to make simple quilts/projects that you can finish or more complicated ones that take a long time and often don't get completed?

The Colorful Quilt - Quilt #1 for 2020

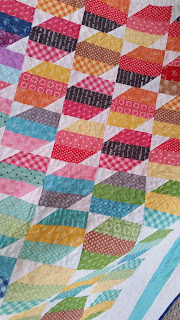
At my quilt retreat in October, I started a jelly roll quilt for one of my friends who was moving away. I was hoping to pretty much finish it up by the end of the weekend. The jelly roll fabric was from Lori Holt and I thought the fabrics were so pretty arranged in the rainbow pattern that they came in.

However, instead of keeping them in rainbow order, I decided to mix them up and make squares with a couple of triangles for the corner, sort of like a snowball, but with only two sides.  


So I sewed them together and then wasn't so sure if I liked how it looked.  (Really, I called it the ugly quilt that day.)  But my friend was moving away and I had a deadline to meet if I was going to give her a quilt before she left.

But I brought the quilt home and stared at it for a few days.  I decided that it needed a teal border that would pull out the teal colors and sure enough, once I added that, it began to redeem itself.  Even the colors seemed like they went together better.

I finished the quilt by the deadline and gave it to my friend before she moved away to Belgium. 

And guess what?  She really liked it!  I call it the Colorful Quilt, because that is what my friend is to me - a very colorful, fun person to be around.  :)

And who knows, I might even get to go to Belgium to visit her!  :)

Oh, My Stars! Quilt #7


 I've been wanted to put together a quilt with Pat Sloan's "Oh, My Stars!" pattern for a while.  I started this quilt for my son last summer.  I cut up a bunch of teals, greens, blues and grays for this quilt from some fabrics that I picked up in Houston at the Quilt Show a year ago.


I had to put the squares up on my design wall so that I could see where to fit in the gray blocks to form the stars.  Then it sat in my dining room (yes, dining room!) for about 6 months.  Finally one day, I put in the gray star points and sewed the rows together.

It certainly is not a hard quilt to make, but it does take a little planning on where you want to place your stars for the most impact.

I finished this quilt in time for Christmas and gave it to my son.  He loved it!  It's so nice to have quilts to cuddle up with that are made for you by your mom.  :)

I used the teal palate to coordinate with the teal afghan that I made him last year.  I machine quilted  free motion swirls for the quilt pattern, but if he looks closely at the quilt, I "wrote" a message in it near the the top corner that says, "To Chris, Love Mom."  Clever, huh?

Here is the quilt when I was putting borders on it at my quilt retreat in Oct.  Why is it so hard to actually finish up a quilt when it is almost done?

This is the 7th (if you count the Baby Quilt that I made last year) that I finished for 2019!  That's a new record for me.  :)

Now to get started for 2020...