Monday, March 18, 2019

Inspirational Word Blocks

When I am out and about at garage sales or rummage sales, I love to find items that I can make crafts out of.  A couple of years ago, I bought a bag of small wooden block, sort of like Jenga blocks. 

Then one day, an inspiration hit me to make little words blocks out of them!  I painted the blocks with off-white craft paint and let them dry.  Then I went out to find a stencil with some small words on it.  I picked up one at Michaels and then stenciled the words onto the blocks.

They were kind of plain so they sat around for a while on my desk.  But then I thought that I could put some stamped images on them to make them stand out more.  I found a couple of bird stamps and some small flowers that I accented with a little pearl. 

I love how they came out! I want to put them all around my house.  Now to just find more blocks to make more... 


Sunday, March 17, 2019

Stamping Project in a Wooden Frame

Yesterday one of my crafty friends held a workshop in her church for ladies to make a shadow box frame craft.  I had wanted to make some of these frames during one of my stamping classes so I went for some ideas.

There were about 16 ladies there and we all had a great time using stamps, punches and the Big Shot to make the pretty flower out of felt.  We were allowed to decorate our frames any way that we wanted. Every frame looked entirely different.

Here is what I came up with.  I branched out from my usual colors and used a pretty rose brick paper for the background.  I added some tan and brown leaf accents, wrapped it with twine, added the beautiful felt flower and some butterflies for embellishment.  I just love how it came out.

It was a lot of fun to go to a craft time where I wasn't the one coming up with the ideas and preparing all of the supplies.  :)


Afterward I saw a photo of me making my project on facebook that someone had posted.  And yes, I am the lady in green.  :)


Floral Romance Hearts


Every month I attend a fun Stampin Up demonstrator's meeting with about 12 other ladies.  We take turns having our meetings in each of our homes.  Sometimes I participate in the swap for that month.  Last month the swap theme was hearts.

I used one of old Bigz dies with heart shaped cut out and make these cute heart ornaments out of coasters and the pretty Floral Romance papers.  Then I stamped and decorated them with using Grapefuit Grove colors and an image from the Forever Lovely stamp set.  

I love how they turned out.  they're very feminine and can be given to a special someone to remind them that you care.  They can be put on a doornob, hang them on something or put them in a display for your home.  

Christmas Wall Hanging in March?

Last year during the holidays I started this quilted wallhanging/table topper for my home.  Needless to say, I didn't get it finished in time to use it.  I took it out the other day and finished it up.  It's a pattern that I found in a Missouri Star video called Cutting Corners Quilt.  Instead of using 2 1/2" strips, I used 1 1/2" strips to make this.   I like the hint of Christmas colors that are in it and the little bird images.  It can be used as a wall hanging or a table topper.

Here is a closer pic of it.  Certainly not hard and a lot of fun to make.  I have a full-sized quilt in the same pattern that I am working on.  I'm hoping to finish it up soon.

The back of it has the cute little bird images on it.  I even have the option of using the back side for a table topper.  Cute, huh?


Quilt #3: The Outdoor Quilt


I call this quilt the "Outdoor Quilt."  My niece, wanted an outdoor themed quilt for her high school graduation.  I wasn't exactly sure what that meant, but I found some fabrics called Alpine that had foxes, birch bark, pebbles, topographical maps and other outdoor images on them. 

So I picked up the jelly roll and started to make this quilt.  That was 4 years ago.

I took the quilt back out in January on my quilt retreat and sewed the borders onto it.  Here is it getting pinned to the backing.  Once I got it home, I quilted it on my longarm and it looks so good with the quilting on it. 

Last weekend I held my first Quilt Retreat weekend here at my house.  Five of my quilty friends came over and we sewed all day on Friday and Saturday.  Here I am sewing the binding onto the quilt.  I can't even say how good it feels to finish these projects.

I told my niece today that her quilt was ready.  She told me that she's graduating from college in a couple of months.  I told her the quilt was for her graduation- I just didn't say which one!  LOL  She hasn't seen any of it yet, so I hope she likes what I interpreted as an Outdoor quilt. 

Saturday, March 16, 2019

Quilt #2: The Nesting Quilt

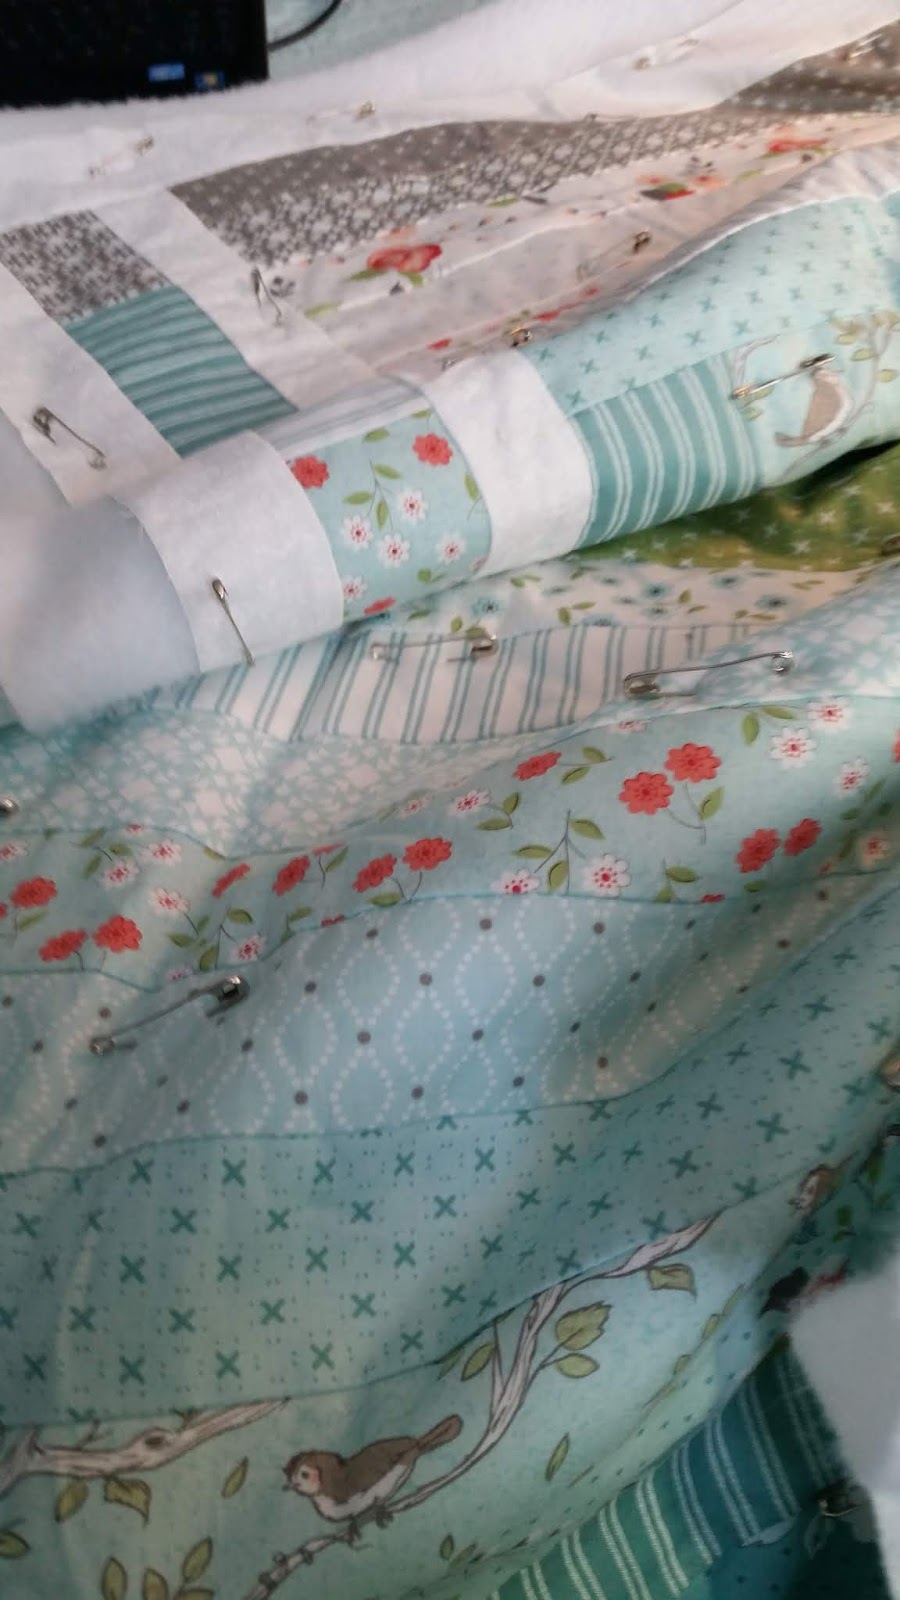
First off, I have to say that I just love this quilt!  I love the simplicity of it, the colors, the fabrics, the size, etc.  The fabric line is from Moda and it's called, "Nest."  It has images of little birds in their nests with pretty coordinating fabrics in teal, gray and coral colors.  And it's just the right size to have as a throw when you want to snuggle up on the couch watching a move or relaxing.

I started this quilt about 6 months ago when I got the "Nest" fabric jelly roll from the Fat Quarter Shop.  I have always wanted to make a jelly roll quilt and I was surprised at how easy it was to make.  While I was sewing together the strips from the jelly roll, I added some charm squares in one of the rows to give it some visual interest.  

I added a pieced strip border on the sides to make it just a little bit wider than the 45" width of the fabric strips.  It was fun, easy and I just love it.  I plan on keeping it for myself, although a lot of my friends have told me that they would just love it, too!

The fabrics in this quilt match the heart wall-hanging that I made for my daughter for Christmas.  I still have some fabric left over, so you might see something else made with these beautiful fabrics in the future.

This is the heart mini quilt that is made from the same fabrics.  

Finally, a quilt just for me!  :)  


Finishing Quilt #1 for 2019: The Bow Wow Quilt

Remember in a previous post that I said that I was going to actually finish projects this year?  Well, I'm off to a good start!  Here is my first quilt!

I call this quilt the "Bow Wow" quilt because it has fabric in it with cute doggie images.  I started it about 4 years ago for my sister and it's been in the unfinished pile for a while.  In January I took it back out and put the squares on my design wall.  I had made some pinwheel blocks to brighten it up a bit, so I added them in rows and sewed it all together.  It's very colorful and the pinwheel blocks give it some movement.  I'm happy with how it turned out.

Here it in on my Handi Quilter getting it's machine quilting.  I am having fun learning new patterns to quilt into my quilts.  This one is very freestyle with flowers in the pinwheel blocks. 

I brought the quilt into my family room to get it ready to sew on the binding and look who found it!  I swear I was only gone for a minute.  At least Ginger gives her approval.  :)

I'm sure my sister will be glad to finally get her quilt.  And she said the cat fur won't bother her in the least.  She has three dogs.  :)


Monday, March 4, 2019

Floral Romance Suite

This week I put together some cards featuring the Floral Romance Suite in the Occasions catalog from Stampin Up.  The papers are so beautiful and the photo doesn't do them justice at all.

I think my favorite is this one - it has a lovely pink vellum printed paper on top of the white cardstock.  Then it is embellished with some cut outs from the Wonderful Floral dies.  I used die from Stitched Labels for the saying.  I always try to have a different size and/or a fancy fold in my card collections.  It is 4.75" square.  (You would need to make an envelope or use a larger store-bought envelope to mail it.)  I got the idea from Sue Vine on Pinterest.

The Floral framelits have this interesting die in it that you can use for the border of your cards.  Isn't
it just amazing?  This card also has decorative vellum on it.  I just love it so much.  Kylie Bertucci came up with the idea and I saw it on Pinterest.


The Happy Birthday is an easy card using the pretty designer papers as the focus.  I also added a couple of little springs to complete the card.

I cut the right edge of the card about 1/4" shorter and added some washi tape to the edge, so it shows up when the card is folded.  It's an easy and great accent to any vertical card that needs a little something.


Finally, I did some coloring in using the stamp set and my blender pens.  I embossed the white cardstock with the new Lace Dynamic folder.  It mades for a very delicate and sweet looking card.

I had a great time making these cards.  The suite really makes some beautiful projects.