Showing posts with label ocean card. Show all posts

Tuesday, June 24, 2025

Beach Day

For this week's Stamp Class, I took out the set Beach Day to give the cards a summer beachy kind of feel.  I paired it with the dies from Paradise Palms.  

For the first card, I used Cloud Cover cardstock and embossed the white with a dotted folder.  Then I cut out a circle from Celebratory Sips designer papers for the focal point.  I added some palm tree and grass dies, and 3 cut-out surfboards.   I cut  out the sun in Pale Papaya and added some seagulls and the saying.  (One card has two palm trees and the second card only has one.)  

I got the idea from Narelle Farrugia.  This card reminds me of the beach on a hazy warm day.  :)

The second card is a little scene along the beach with two chairs and an umbrella.  I didn't buy the dies for this set, so we cut them out.  I used a Blend marker in Crumb Cake for the sand and then some sponging in Pool Party to create the sea.  


The designer papers are from Country Woods designer papers.  I got the idea for this card from Heidi Collins.  I love the rustic beach look of this card.  

For this final card, I used Stampin Up watercolor crayons (remember them?) to make the beach and ocean waves.  I just love how this turned out; it looks like the foam from the top of waves crashing onto the beach!  I could be sitting right there.  Wait - do I hear the sound of the waves and the seagull?  

I thought the card needed a bow to look complete.  I had fun making this card and want to make more.  It was fun painting the ocean.  All of the ladies who come to class loved painting the ocean, too.  


Monday, September 2, 2019

Heirloom Frames & More


One of the first sets that caught my eye from this year's Stampin Up catalog was the Woven Heirlooms stamp set, papers and embossing folders.  Although I didn't use any of the pretty papers for this class, I did make 3 cards using the rectangle die to show how versatile that it can be.

For this first card I stamped the lacy image from Southern Serenade for the background in Soft Sea Foam.  This gave the card a soft, feminine feel.  The sayings and paper flower cut outs are from the Free as a Bird stamp set and it's coordinating paper.  The little envelope is from Love Notes framelits.  I got the card idea from Helen Edenbreejen on Pinterest. 


Next up I made this pretty vintage card featuring the Woven Thread Suite.  I have never put these colors together, but I saw this card online and decided to give it a try.  I love the richness of the colors with the pale purple in the background.  So beautiful. 

The card was originally made by Elizabeth Price.  She had used the First Frost stamp set, but because I didn't have that, I substituted an older flower set.  I think it came out just as nice.  For some reason, I especially love this card.


The next card is, of course, a Christmas card.  I used the tree cut out from the In the Woods die set, the saying from Winter Woods and the detailed trim from Dashing Deer stamp set.  I cut out the tree using silver glimmer paper.  I cut out two trees so that I could put another one underneath the first one.  And even though you can't see it, this makes the tree more stable.  The blue cardstock is Seaside Spray.  This is an easy, striking card.  I saw it online by Sherry Wayt. 


Lastly, we made this seaside card that uses Come Sail Away designer paper.  You really could use any blue or tan paper for the background of this card.  Then I cut a circle frame using 2 different sized circle dies for the frame.  We used watercolor crayons on watercolor paper for the sea and the beach.  But you could paint your colors on from the markers or the stamp pads.  The card idea is from Stacia Siorna. 

The chair is from Colorful Seasons and the seashells are from an older ocean stamp set that I had.  I just love this card.  Makes we want to drive to the ocean today.  Well, maybe not today.  But sometime soon.  :)

Monday, August 1, 2016

Going to the Ocean from My Stamping Room

Last weekend I took a trip to the Connecticut/Rhode Island border with a couple friends to visit the ocean.  It was so lovely there.  Sitting on the beach just watching the waves and soaking up the sun was just what I needed.  :)

Coming back into my stamping room this week, I made an ocean-themed card with the little sandpipers from the Wetland set.  I especially love this set now because I recently moved to Sandpiper Lane!

Honestly, it took me a while to find the watercolor paper (some of my supplies are still in boxes), but once I did I was quite happy with this card.  I used Gorgeous Grunge to make the sand appear and then I highlighted it with Wink of Stella to give it a little glisten.

I think you can see the hint of glitter that the Stella brush gives this card.

 I made several versions of this card, trying out different inks to see which one that I liked the best.  This one is made using black Memento pad and the others are made with Early Espresso brown ink.  I like the espresso ink the best.  I found the idea for this card on Pinterest  by Debbie Lamb.

This next card is an easy-to-make card using washi tape as an embellishment.  I used the Flower Shop stamp set that comes with a coordinating punch that makes the stamping so quick and easy.

On this alternative version of the card, I stamped on vellum using Rose Red ink and clear embossing powder.  It's hard to tell from the photo, but the bottom half of the card is embossed with a pretty scallop.  During my class, I let the students choose if they wanted to emboss on the vellum or just stamp on the pink paper.  It was pretty much 50-50.  The idea for this card came from Rachel Tessman.

After we accented the card with pearls, we used a little Wink of Stella to give the flowers a silvery glow.  Have you not heard about Wink of Stella?  You can order it here for only $8.00.  Click on Shop Now and enter Stella into the look-up box.  (If you want to look at the catalog, it's on page 181.)  What a great new product it is!

 The third and final card for this week's class is this pretty card made using the Number of Years stamp set.  I saw this idea by Elizabeth Miller on Pinterest. 

While I did like the card made in the mint macaron green, the other side of the paper has this pretty floral pattern on it.  The stampers could use either side of the paper.

I thought the colors were very pretty for this card.  We used Mint Macaron, Flirty Flamingo, Baja Breeze (an older color) and Old Olive for the leaves.

After adding mini pearls and a ruched ribbon in Flirty Flamingo, we colored in the flowers with Wink of Stella.  Everyone loved using this new product.

When the evening was over, I had everyone vote for which card they liked the best.  How about you?  Which one would you pick?  Unanimously, the Sandpipers won for the day.  :)


Tuesday, August 27, 2013

Some Summer Fun


I just hate to see summer come to an end.  Here in upstate New York, we really only get about 2 months of warm weather.  No sooner does summer start and it's already over!

This week I wanted to make some cards and projects that honored the warm days of summer.  This card is made with an older stamp set called Crab and Company.  I just love going to the ocean.  This little crab and his sidekicks are so cute!  I copied the idea for this card from Christy Charles.  I had so much fun just making it!


I tried to think of other things that remind me of summer.  We all scream for Ice Cream!  Actually I am more fond of the new frozen yogurt places, but I did have ice cream a couple of times this summer.  I made this card using the pennant die and a cupcake sizzlet die.  I used the hounds tooth embossing folder to make the triangle look like a cone!


Watermelons, of course!  (Do you see the food trend here?)  I have already posted this card, but I thought that it really fit into the summer theme.  The card idea was copied from Debbie Henderson.


This bright cheery card made me think of the sunshine!  I copied the idea from a demonstrator on Stampin Up, Vicki Hayes.


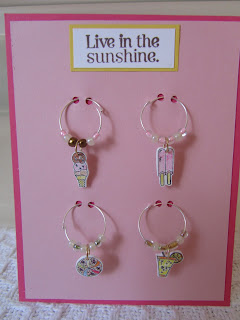
And, last, but not least I made some wine glass charms!  They're made with an old summer set that has a lot of fun stamps in it.  I stamped onto shrink plastic with Staz On ink and colored in the images with colored pencils.  Then I punched out a hole in the plastic and shrunk them with a heat tool.  I used a clear block to flatten them after they had shrunk. 

I added a jump ring to the charm and put them on a set of wire earring along with some seed beads.  They came out SO cute.  I am definitely going to make some more of these charms!

What stamp set do you have that would make cute wine glass charms?