Showing posts with label nature's prints. Show all posts

Monday, April 10, 2023

Nested Friends Trio of Cards

This week's stamping class featured a stamp set called Nested Friends.  (There's only one bird image in it, so I'm not sure why it's called nested "friends.")  I paired it with Honeybee Home and made three cards.

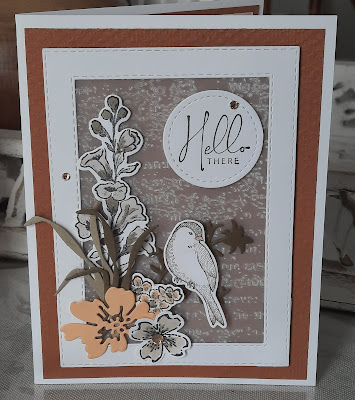
The idea to make this first card is from Gail Ellis on Pinterest.  I like a lot of her designs and use of color.  The background is Cinnamon Cider and the white frame is made using the Stitched Rectangle dies.  I embossed a piece of vellum with the Timeless Texture folder and adhered it to the back of the frame.  Then I put it on my card using dimensionals to give it some lift and interest.  

The flower is from Honeybee Home, as well as the the sprigs.  One of the flower cut outs is acting like a little branch for the bird to sit on.  The flower cut out is from Hand Penned dies and the tan flower is from Regency Park, using the punch for the trio of flowers.

Hello There sentiment is from Nature's Prints.  I love the soft, look of this card.  

For the second card, I used Blushing Bride cardstock, with a layer of embossed white and some papers from Abigail Rose papers.  I added the nest and the bird from Nested Friends along with some cut out eggs that I speckled.  The oval frame is from Framed Florets.  The saying is from Honeybee Home and the flower is from Regency Park.  I got the idea for this card from Kim McGillis.

The third card uses more designer papers from Abigail Rose and the cut outs from Nested Friends.  The pink sprig is from Honeybee Home and the flower from Regency Park.  This idea is from Julie Gilson.

I have to say that I love all of the new products from Stampin Up.  They make paper crafting such a pleasure.  You can mix and match the stamp sets and the dies for truly amazing cards and projects.  I am so glad to be a part of the Stampin Up family.  

This summer will be 20 years for me.  Crazy, I know.  


Monday, March 13, 2023

Queen Bee is the Bee's Knees

When I first saw the set, Queen Bee in the mini catalog, I knew that I had to have it!  I love the detail in this bee stamp.  :)  For the first card, I made a fancy fold and used the papers from the Delicate Desert designer papers.  

I stamped the bee and also cut out an extra set of wings to match her.  I used the flower dies from the set and cut them out in silver paper.  The sprig is also from the set and I love how it all comes together.

I also used the print stamp to make the card look like a "collage" card.  She is so much prettier in real life, but who wouldn't want a card that lets them know they are the "Queen Bee" of their own life?

I got the idea for my three cards from Gail Ellis on Pinterest.

The next card appears to be a bit more collage-looking.  I told the ladies who come over to stamp that you can keep adding more things or keep the card simple.  That's the fun about the collage cards.  All of the pieces and embellishments can be interchangeable, too.  

I paired the Bee with Nature Prints stamp set and dies for my cards.  On this card, I used the wreath from the Natural Prints dies.  

For my cards I used a mixture of different greens to give them a nice green/gray look to them.  

For the third card, I embossed the bee in silver.  But after I made the card, I tried using the gray emboss powders and I liked the look of that better.  I used Nature's Prints for the center section of the card.  It's hard to tell in the photo, but for the background I used a subtle embossing folder to give the card more texture.

I think the Bee can be very versatile, depending on how you use her.  Change up the color palette (rust and corals) and you will have a totally different look to your cards.  

For the final project, we made desk calendars.  I know it's already March (!) but everyone was excited to finally get a calendar.  :)

Here's a pic of some of the ladies working on their Bee cards.  


What sort of things have you done with the Queen Bee?  


Friday, September 16, 2022

Nature's Prints

I'll be honest, when I first saw the Nature's Print set in the new catalog, I didn't think that I needed it.  (Ha!)  I have a couple other sets that look very similar. 

But after seeing all of the pretty cards on Pinterest, I changed my mind.  I think it pairs so well with the Fern embossing folder, don't you?

I watched a video from Lisa Curcio to learn how to make this amazing cut out technique.  I just love the pretty green color (Just Jade) and how it turned out.
Originally I was going to make the card with some designer papers that had leaves on them.  But when I turned the paper over, I loved the Gray Granite brick wall.  It gives the card a very subtle look.  The papers are from last year's Bloom Where You Are Planted papers.  I saw this card made by Jan Musselman and changed the color to green.

For my next card, I kept with the green theme and added some stamped images to the front.  I used the Fern embossing folder and love how this card turned out.  I saw the idea for this from Beth Wainright.  The base of the card is Mint Macaron and the accent circle is Just Jade.

The second time that I made the card, I reversed the colors of the stamped images.  In the first card, the focal image is a light green and in the second card, it is the darker image.  Which one do you like better, the light or the darker?  

For the third card, I used Gray Granite for the base and added just a hint of Mint Macaron for the accent color.  I saw this idea from Akiko Sudano.  I added the brick paper to the front of the card and the pretty cut-out wreath from the Natural Prints die cuts.  I love the subtle look of this card along with the Fern embossing folder.


The three cards coordinate well together and I had fun making them.  I can imagine this set in another color scheme and it would be just as pretty.  :)